
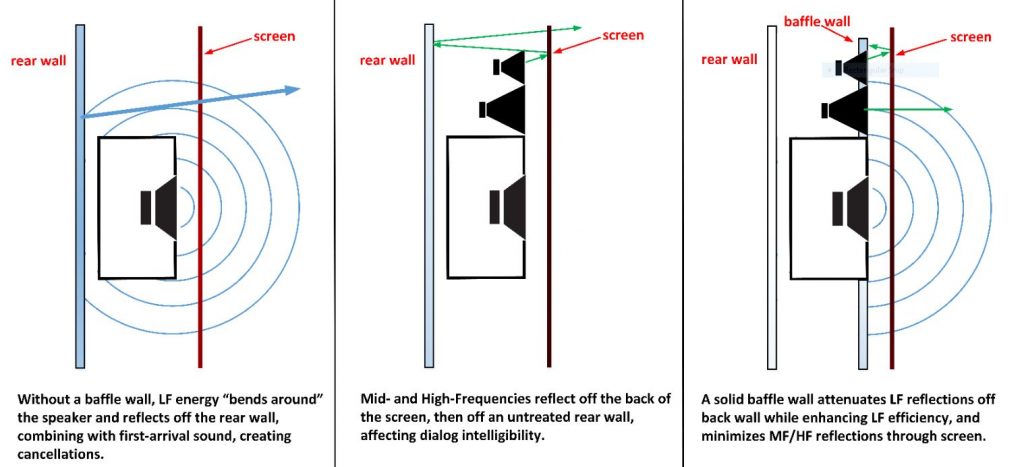
In some ways, sound waves are like light waves. They radiate into space, reflect off objects, and lose energy upon contact with absorptive surfaces, walls, and with distance from their source. Sound waves can be more challenging to control, primarily because we can’t see them. Low frequencies are especially difficult because their long wavelengths (up to 30 feet or more) are essentially omnidirectional, and can “bend around” objects and excite resonances (asynchronous vibration) in walls and ceilings. And when a long wavelength reflects off a hard surface, the reflection can combine with the directly radiated wavelength and cause cancellations, which results in random “dead spots” of sound coverage. Since we can’t see sound waves, it’s very difficult to predict where in the room they might occur. The best course of action is to design the cinema in a way that minimizes reflections at the source.
In an acoustics lab, of course, none of this matters. Engineers measure loudspeaker response while removing most of the effects of these properties. But in a real room, all of these properties come into play, and if you don’t address them during installation, you will not achieve the best possible sound quality.
This is especially problematic for loudspeakers behind (or at) the screen. Screen channel loudspeakers and subwoofers produce a lot of low-frequency energy. These speakers are generally placed close to a rear wall of the room behind the screen, which provides an easy surface to bounce long wavelength (omnidirectional) energy back toward the audience (with delay) and combine with the energy radiated directly from the speaker and cause problems.
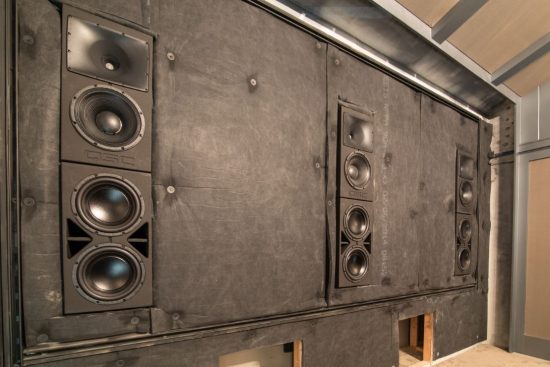
Although it is impossible to completely eliminate these destructive reflections, one of the best ways to minimize them is to build a full baffle wall behind the screen. Screen channel loudspeakers and subwoofers are then flush-mounted into the baffle wall so that energy is less likely to bend around the speakers and reflect from the rear wall. A full baffle wall also provides “loading” of the LF speakers and subwoofers, which can reinforce low-frequency energy and provide 3 dB or more of “free” acoustical output without extra amplifier power (if solidly-built, producing no resonances of its own).
The rear of a typical perforated screen is quite reflective too, especially for short wavelength, high-frequency energy. With no baffle wall in place, HF energy will reflect off the rear of the screen, then off the back wall of the building, and back through the screen to the audience. Even with a full baffle wall, if it’s not lined with thick absorptive material, high-frequency reflections will reflect off the rear of the screen, then off the untreated baffle wall surface, then back through the screen. These reflections combine with earlier arriving direct-field energy, and cause cancellations, destroying dialog intelligibility.
For these reasons, most cinema sound system designers recommend full baffle walls with heavy acoustical treatment for screen channel loudspeakers and subwoofers. Baffle walls are a key requirement for both THX and QSC Certified Theatres (although in some cases, smaller “bafflettes” are allowed). There are many acceptable ways to build these walls, but here are some general guidelines that will produce good results.
A full baffle wall extends from wall to wall and floor to ceiling behind the screen. It must also be extremely rigid to avoid resonances created by high-energy, low-frequency waves. In general, it needs to be built at least as solidly as a well-constructed partition wall, but with extra panel reinforcement on the front-facing surface and enhanced bracing on the backside (due to the weight of the multilayered front panels.
Standard 16-inch stud width spacing makes sense because you will likely be using 4-foot wide gypsum and multi-density fiberboard (MDF) or plywood for the front panels. Two-by-fours will suffice, but 2×6 studs will provide even greater stability if the wall is large and especially tall. Between pairs of very long upright studs, horizontal 2 x 4 (or 2 x 6) “fire stops” should be attached at least every 8 feet from floor to ceiling – although in this case, their purpose is not to block flame travel. It’s more to further minimize tall sections of the “gypsum/MDF sandwich” from resonating at very low frequencies.
If the loudspeaker platform behind the screen is attached to the baffle wall structure, it’s important to take steps to isolate the screen channel’s LF enclosure from the platform. This will minimize LF energy transfer from the speaker to the platform and baffle wall. Some LF enclosures are pre-equipped with hard rubber or neoprene feet, which do a good job of isolation. If your speakers do not have integrated rubber feet, Mason Industries offers a variety of neoprene pads that work well.
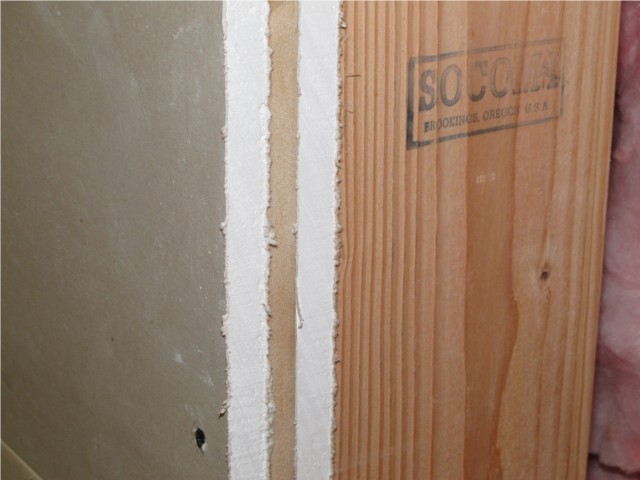
Assuming a solid stud frame, the next most critical part of the baffle wall construction is the front surface (which faces the rear of the screen). It’s impossible to use too many layers (low frequencies can be powerful), but for practical purposes, the front panel should consist of at least two layers of gypsum (sheetrock), and a third layer of 5/8-inch MDF or plywood, with overlapping joints. (Don’t stack joints from two adjacent layers). Total thickness should be at least 1.5 inches. Many consultants recommend sandwiching the wood material (MDF or plywood) between the first two layers of gypsum; the alternating densities will mitigate resonances, and the middle layer of wood material provides a better grip for the screws attaching the outer layer of gypsum.
Besides structural rigidity, it is critical that the front surface is treated with thick, acoustically-absorptive material. Acoustic treatment material is not effective below about 250 Hz, but it does a decent job of attenuating MF and HF reflections from the back side of the screen.
While almost any fiberglass batt or rolls will work, most sources recommend Johns Manville Linacoustic duct liner, at least 1.5 inches thick. It’s denser than home insulation and is already black on one side, so it shouldn’t need spray painting. However, metallic attachment hardware might require a hit of ultra-flat black spray paint to minimize visible through-screen light reflections.
As always, it’s recommended that you have your plans certified by a mechanical or structural engineer and hire a licensed building contractor to build the wall. Obviously, building a baffle wall like the one described here is not an inexpensive project. But even if your budget prevents you from doing everything we’ve suggested here, something is better than nothing, and every little bit you can do to improve the overall sound in your cinema will make the experience that much better for your valued patrons. And it’s that experience that will keep them coming back, time and time again.
Mark Mayfield
Latest posts by Mark Mayfield (see all)
- Seven “Cins” of Cinema - October 26, 2021
- Introducing Cinema 101 - May 27, 2021
- Control Your Barco Cinema Projector with Q-SYS - April 9, 2021