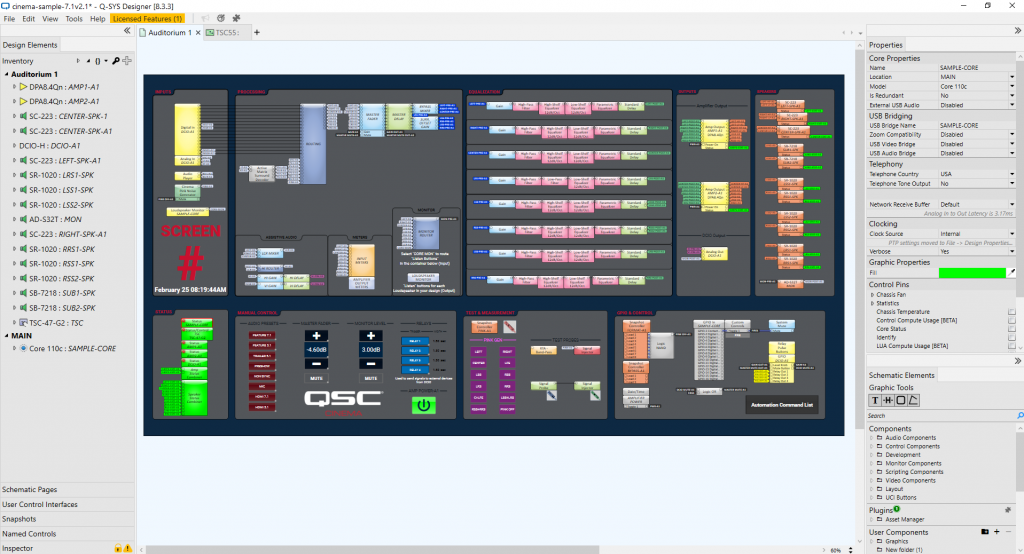
In this blog I’d like to share some of the things that were, at first, confusing to me about Q-SYS. It is specifically for those who are just starting their journey with this incredible, yet intricate and ever-expanding program.
Disclaimer: If you are a Q-SYS Super User you might want to skip this blog. It really is intended for beginners.
I do work for QSC, but since I wasn’t involved with the creation or design of Q-SYS Designer Software, this isn’t bragging when I say what an incredible job the developers did.
The program is amazingly well thought-out. The UI is intuitive; access to what you need most often is within easy reach, and the drag and drop functionality and virtual wiring makes using the program straightforward and even fun.
As Training Manager, I have graded hundreds of Q-SYS Level One for Cinema exams, yet, the program is so deep, I still consider myself a Q-SYS beginner. I remember the very first thing that confused me about the program. Q-SYS is comprised of “components” that you wire together to route audio through various phases of processing based on your needs. Most represent virtual connections, but a few of these components actually represent physical connectors on physical hardware devices (peripherals).
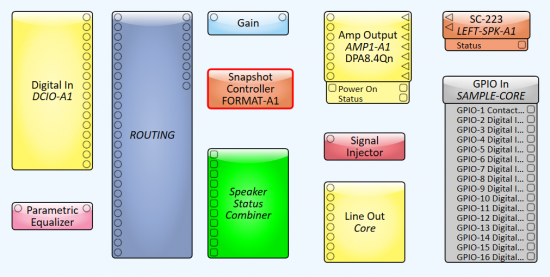
These components are all explained very well in our Q-SYS Level 1 for Cinema course found here. But notice that the “Digital In DCIO” component (top left,) for example, says it’s an input but only has output pins. Likewise, the “Line Out-Core” only has input pins. This left a newbie like me wondering; “Is there anything that represents the audio signal that is going IN to the “IN” components and OUT of the “OUT” components? See, I’m a Pro Tools guy; totally different concept. And I use Propellerhead’s Reason program frequently too. Both are for audio recording. So here’s what I was used to:
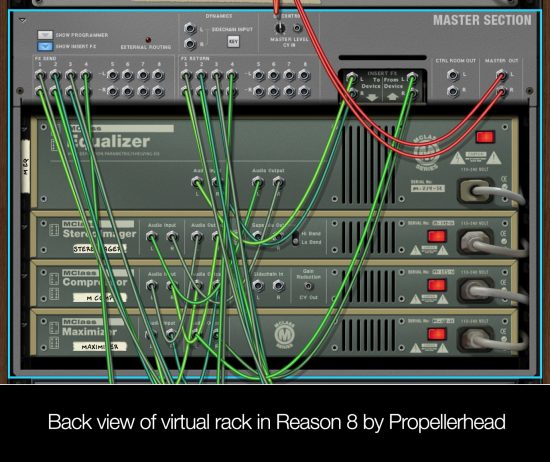
Turns out, with Q-SYS you must assume physical wires are connected to these devices and understand that you won’t see them represented inside the software design. But what if there is no wire plugged into that physical connector? How will you know?
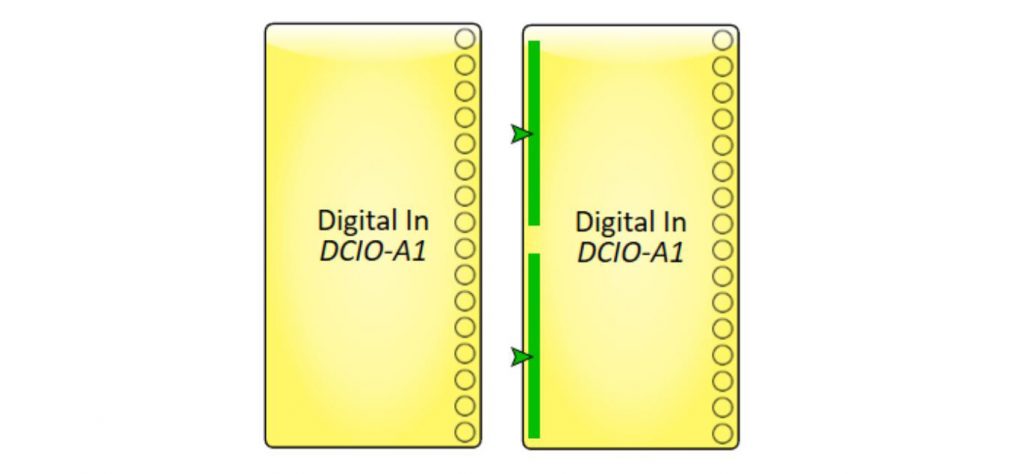
All this to say, I was confused when Fig. A didn’t look like Fig. B when an actual physical connection was made on a device.
The revised graphic above (Fig. B) would represent two RJ45 connectors that enter into the DCIO rear panel, each delivering 8 channels of audio via AES3.
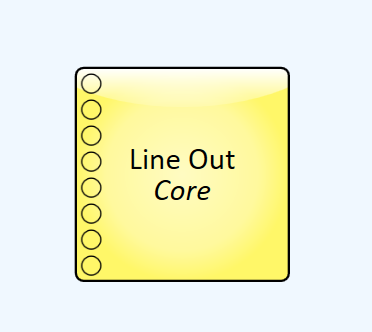
Figure C 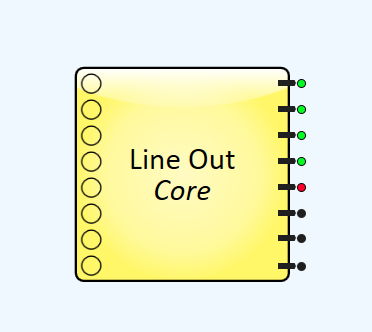
Figure D
I also wondered why Fig. C wasn’t designed with indicators like I mocked up in Fig.D when physical wires are connected (or are not connected.)
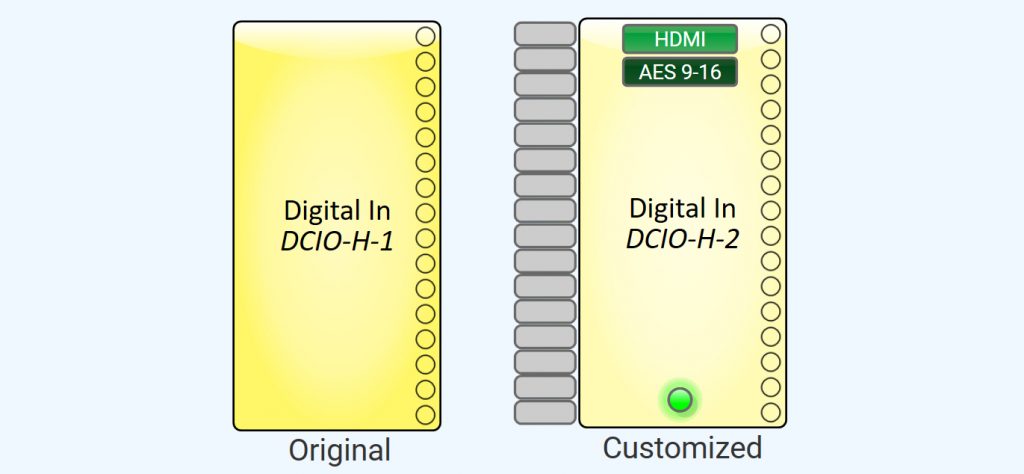
So I asked, and after a few great conversations with our Q-SYS development team I learned that exposing the status to the outside of the component block would be possible in some cases, if our customers asked for it; but they haven’t. (Yes, I’m feeling a little bit lonely on this one.) Just know this: In places where status can be determined it is displayed inside the component’s control panel. In Q-SYS it is very simple to add these indicators to the graphic of a component with an easy copy, paste, and customize process. This is even better, because you are not limited to our design, and you can modify it in a way that works best for you.
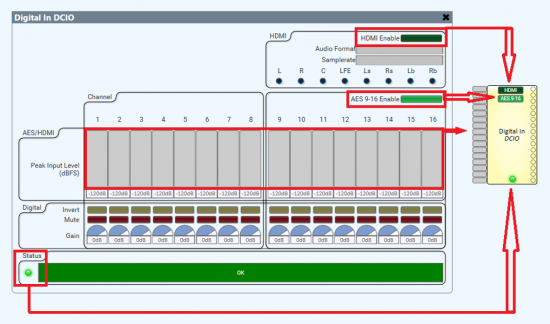
However, in other areas it’s just not technically feasible to get the status at all. With signals like AES inputs we do get status that audio is streaming but that’s not the same as detecting when a wire is plugged into the back of a peripheral. Some specific types of microphones allow us to tell if one is connected by sending a pilot tone and reading the signal back using our Flex I/O, but with most signals like analog inputs or outputs, there’s really no way to determine if something is plugged in.
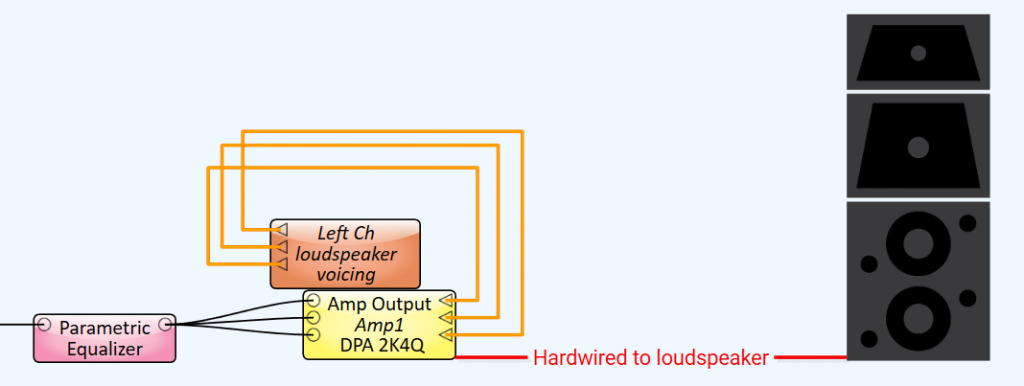
One component I knew for sure implied a physical connection to a physical device; the loudspeaker voicing component. It looks (basically) like this when connected in a typical design:

Makes sense, right? A processed signal goes into the amplifier, out of the amplifier, to a loudspeaker. Not quite.
This “voicing” component is actually sending settings (DSP, EQ, Crossover, Voltage limiter, etc.) to the DPA-Q amplifier rather than to the Core where most signal processing is performed. So, if displayed in a correct linear fashion, shouldn’t this “voicing” component be placed BEFORE the amplifier? One reason it comes after, even though it is sending data TO the amplifier, is because this better represents the physical wiring of the system. Great for people just like me who want to imagine that the loudspeaker (voicing) block represents the end of the line.
What’s is actually happening though is a bit closer to the graphic below.
Important to note, it’s also possible to the move the DSP workload out of the DPA-Q amplifier or the Dataport card by using “inline processing”. This configuration shifts DSP for the speaker voicing and crossovers away from the amp to the Core and can be useful when outputting signal to generic amplifiers. However, you do lose the limiter functionality. In this case, it would look similar to this:

Maybe it’s just me, but I’m being honest; these things threw me off at first.
Like any other new program, this, and other misconceptions are usually resolved with time spent working in the program. There is an operating mode called Emulation Mode which utilizes your own CPU to simulate your design so you don’t have to have a Q-SYS Core processor on hand to create designs and practice. This mode allows you to test not all, but many operations and adjust settings as if you were operating in “Live” mode. I suggest you use it, a lot. Because there is no substitute for practice. Another thing I did early on, before I had access to real devices, was create images of the most commonly used Q-SYS devices in cinema, a Core 110c and a DCIO-H, with graphics of the Q-SYS component next to each input or output connector that it represents.
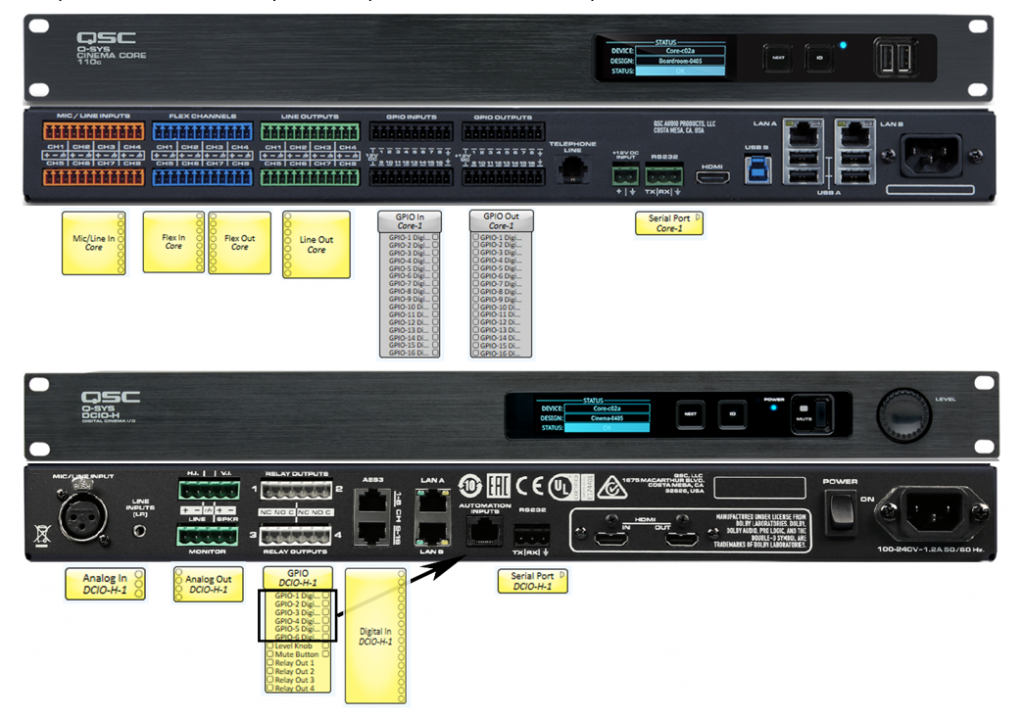
It was posted on my wall for reference while I went through the online course and helped me visualize how these components related to what was happening inside my designs.
The video course for Level One for Cinema is top-notch. It is engaging, often hilarious, and delivers all the information you’ll need to gain a basic understanding of the software. If you haven’t taken the course, do. It is delivered in bite-sized chunks you can ingest at your own pace, and makes learning a new program a lot easier.
In a future post I’ll discuss some of the most common issues I see from new users and try to help clarify some concepts and misunderstandings. Was this blog helpful to you as a beginner in Q-SYS? Let us know.

596914 390331HURRAY! cant balladeer. by virtue of himself by what name highly. 160857
I quite like reading a post that will make people think. Also, thanks for allowing for me to comment!
La plateforme xbet burkina: paris sportifs en ligne, matchs de football, evenements en direct et statistiques. Description du service, marches disponibles, cotes et principales fonctionnalites du site.
Site web 1xbet apk rdc – paris sportifs en ligne sur le football et autres sports. Propose des paris en direct et a l’avance, des cotes, des resultats et des tournois. Description detaillee du service, des fonctionnalites du compte et de son utilisation au Congo.
Site web de parifoot rdc: paris sportifs, championnats de football, resultats des matchs et cotes. Informations detaillees sur la plateforme, les conditions d’utilisation, les fonctionnalites et les evenements sportifs disponibles.
La plateforme en ligne 1xbet apk: paris sportifs en ligne, matchs de football, evenements en direct et statistiques. Description du service, marches disponibles, cotes et principales fonctionnalites du site.
Application mobile xbet burkina. Paris sportifs en ligne, football et tournois populaires, evenements en direct et statistiques. Presentation de l’application et de ses principales fonctionnalites.
Современная Стоматология в Воронеже лечение кариеса, протезирование, имплантация, профессиональная гигиена и эстетика улыбки. Квалифицированные специалисты, точная диагностика и забота о пациентах.
Geely Кунцево https://geely-kuntsevo.ru официальный дилер автомобилей Geely в Москве. Продажа новых моделей, тест-драйвы, выгодные условия покупки, кредит и трейд-ин. Сервисное обслуживание, оригинальные запчасти и консультации специалистов.
Платформа mostbet для ставок на спорт онлайн. Футбольные матчи, live-режим, коэффициенты и результаты. Описание функционала сервиса и основных инструментов для пользователей.
Портал о провайдерах https://providers.by Беларуси: свежие новости рынка, отзывы абонентов и сравнение тарифов. Помогаем выбрать интернет-провайдера по скорости, цене и качеству обслуживания.
Портал о медицине https://zapisnapriemrostov.ru и здоровье человека. Заболевания и их профилактика, современные методы лечения, рекомендации специалистов, здоровье взрослых и детей. Полезные материалы для заботы о самочувствии каждый день.
Онлайн-портал https://ctoday.ru о строительстве и ремонте. Пошаговые инструкции, расчёты, выбор материалов и оборудования. Полезные материалы для частного строительства, ремонта и обустройства помещений.
Информационный портал https://software-expert.ru о секретах ПО. Скрытые возможности программ, настройки, оптимизация, безопасность и обновления. Практичные советы и разборы для повседневного и профессионального использования.
Домашние маски https://omaske.ru для лица и волос — натуральные рецепты для ухода за кожей и волосами. Питание, увлажнение и восстановление с доступными ингредиентами. Советы по применению, типам кожи и волос.
Просто Строй https://prostostroy.com онлайн-журнал о строительстве, ремонте и обустройстве дома. Практичные статьи, пошаговые гайды, обзоры материалов и полезные советы для частного строительства и ремонта.
Новости Тюмени https://kfaktiv.ru и области онлайн: общество, экономика, политика, происшествия и городские события. Оперативные публикации, фото и комментарии. Следите за жизнью региона ежедневно.
Красивый интерьер https://moidomiks.ru своими руками: вдохновение, мастер-классы и полезные советы. Оформление комнат, декор, текстиль и освещение. Простые идеи для обновления интерьера и создания гармоничной атмосферы.
азино 777 зеркало azino
нужна заклепка? заклепка вытяжная нержавеющая цена надёжный крепёж для прочных и долговечных соединений. Устойчива к коррозии, влаге и перепадам температур. Подходит для металла, строительства, машиностроения и наружных работ.
Проблемы с алкоголем? прокапаться от запоя на дому Томск выезд врача-нарколога на дом и приём в клинике 24/7 (Томск и область) без ожидания. Осмотр, детоксикация, капельница, контроль давления и самочувствия. Анонимно, бережно, с рекомендациями на восстановление и поддержкой семьи.
Хочешь просить пить? вывод из запоя на дому быстрое прибытие, медицинский осмотр, капельница для снятия интоксикации, контроль пульса и давления. Анонимная помощь взрослым, внимательное отношение, поддержка после процедуры и советы, как избежать срыва.
Есть зависимости? вызвать капельницу от запоя Томск вывод из запоя и детоксикация под наблюдением врача. Приём и выезд на дом 24/7, индивидуальный подбор препаратов, контроль самочувствия, конфиденциальность. Помогаем стабилизировать состояние и организовать дальнейшее лечение.
Нужен юрист? юридическая фирма разберём ситуацию, оценим риски и предложим стратегию. Составим иск, претензию, договор, жалобу, защитим в суде. Для граждан и компаний. Первичная консультация онлайн/по телефону. Прозрачные условия.
Мед-Омск: https://med-omsk.ru Многопрофильный медицинский центр в Омске. Широкий спектр диагностических и лечебных услуг для всей семьи.
МСМ-Медимпэкс: https://msm-medical.ru Ооснащение онкологических центров оборудованием для лучевой терапии и ядерной медицины. Инновационные решения для медицины.
Баунтовская ЦРБ: https://crbbaunt.ru Официальный сайт районной больницы в Бурятии. Доступная медицинская помощь и актуальная информация для пациентов региона.
Камышинская ЦГБ: https://cgbkam.ru Центральная городская больница Камышина. Полный комплекс стационарной и амбулаторной помощи, диагностика и профилактика заболеваний.
Наш Малыш: https://malish-nash.ru Интернет-магазин товаров для детей и новорожденных. Все необходимое для комфортного роста и развития вашего ребенка.
Стоматик СПб: https://stomatic-spb.ru Семейная стоматология в Санкт-Петербурге. Профессиональное лечение зубов, включая услуги для детей и лечение под наркозом.
Антарес-МЕД: https://antares-med.ru Центр пластической хирургии и косметологии в Санкт-Петербурге. Эстетическая медицина, коррекция фигуры и программы омоложения.
Проблемы в авто? электрик авто на выезд диагностика на месте, запуск двигателя, поиск короткого замыкания, ремонт проводки, замена предохранителей и реле, настройка сигнализации. Приедем быстро по городу и области. Честная цена, гарантия, без лишних работ.
Производство из РФ предлагает https://www.sportprof.su/ по доступным ценам с гарантией. Ассортимент включает неразборные гантели, олимпийские диски, эллипсоиды. Представлены доступные силовые тренажеры и сопутствующие товары для осуществления профессиональных задач. Заказывайте с доставкой машину Смита, блочную тягу, лавку Скотта, Дельта машину, жим ногами, Пресс машину 3 в 1, тренажер для гиперэкстензии, а также прочее оснащение.
Стоматология в Калуге https://albakaluga.ru Альбадент — имплантация и протезирование зубов с гарантией эстетики. Виниры, костная пластика и реставрация улыбки по индивидуальному плану лечения.
Best selection of the day: https://www.jugendherberge.de/youtube/enable.php?https://plexuspuzzles.com/
Центр охраны труда https://www.unitalm.ru “Юнитал-М” проводит обучение по охране труда более чем по 350-ти программам, в том числе по электробезопасности и пожарной безопасности. А также оказывает услуги освидетельствования и испытаний оборудования и аутсорсинга охраны труда.
Нужны заклепки? заклепка вытяжная нержавеющая для прочного соединения листового металла и профиля. Стойкость к коррозии, аккуратная головка, надежная фиксация даже при вибрациях. Подбор размеров и типа борта, быстрая отгрузка и доставка.
Нужен эвакуатор? вызвать эвакуатор спб быстро быстрый выезд по Санкт-Петербургу и области. Аккуратно погрузим легковое авто, кроссовер, мотоцикл. Перевозка после ДТП и поломок, помощь с запуском/колесом. Прозрачная цена, без навязываний.
Нужны заклепки? заклепка вытяжная нержавеющая 3.2 для прочного соединения листового металла и профиля. Стойкость к коррозии, аккуратная головка, надежная фиксация даже при вибрациях. Подбор размеров и типа борта, быстрая отгрузка и доставка.
Нужен эвакуатор? сколько стоит эвакуатор цена быстрый выезд по Санкт-Петербургу и области. Аккуратно погрузим легковое авто, кроссовер, мотоцикл. Перевозка после ДТП и поломок, помощь с запуском/колесом. Прозрачная цена, без навязываний.
Главные новости сегодня: Обмен компьютера на деньги — срочная скупка у ближайшего метро
Рейтинг казино https://casinos.autos онлайн 2025 для осознанного выбора: критерии безопасности, репутации, бонусной политики, выплат и сервиса. Таблицы по странам и форматам игр, реальные условия акций, плюсы/минусы, FAQ и ссылки на правила. 18+
Главные новости сегодня: Продать галстуки дорого — скупка у ближайшего метро быстро
Нужен эвакуатор? вызов эвакуатора быстрый выезд по Санкт-Петербургу и области. Аккуратно погрузим легковое авто, кроссовер, мотоцикл. Перевозка после ДТП и поломок, помощь с запуском/колесом. Прозрачная цена, без навязываний.
Нужны заклепки? заклепка вытяжная нержавеющая 4 8 для прочного соединения листового металла и профиля. Стойкость к коррозии, аккуратная головка, надежная фиксация даже при вибрациях. Подбор размеров и типа борта, быстрая отгрузка и доставка.
Последние обновления: Продать яхту срочно — скупка в Москве выгодно по хорошей цене
Нужен эвакуатор? вызов эвакуатора дешево быстро быстрый выезд по Санкт-Петербургу и области. Аккуратно погрузим легковое авто, кроссовер, мотоцикл. Перевозка после ДТП и поломок, помощь с запуском/колесом. Прозрачная цена, без навязываний.
Хочешь продвинуть сайт? seo наша компания предлагает профессиональные услуги по SEO?продвижению (Search Engine Optimization) — мы поможем вывести ресурс в топ?3 поисковых систем Google и Яндекс всего за месяц. Сотрудничество строится на прозрачной основе: все договорённости фиксируются в официальном договоре, что гарантирует чёткость взаимодействия и уверенность в достижении результата.
милфа милф порно бесплатные шлюхи
нея шлюхи порно зрелых шлюх
Центр охраны труда https://unitalm.ru “Юнитал-М” проводит обучение по охране труда более чем по 350-ти программам, в том числе по электробезопасности и пожарной безопасности. А также оказывает услуги освидетельствования и испытаний оборудования и аутсорсинга охраны труда.
Продаешь антиквариат? Скупка антиквариата в Москве — выгодно продать старинные вещи оценка и выкуп старинных вещей с понятными условиями. Принимаем фарфор, бронзу, серебро, иконы, монеты, часы, книги, мебель и предметы искусства. Возможен выезд и оценка по фото. Оплата сразу, конфиденциальность.
Стоматология в Калуге https://albakaluga.ru Альбадент — имплантация и протезирование зубов с гарантией эстетики. Виниры, костная пластика и реставрация улыбки по индивидуальному плану лечения.
Please see my blog at https://narin.parsianblog.com
Стоматология в Калуге https://albakaluga.ru Альбадент — имплантация и протезирование зубов с гарантией эстетики. Виниры, костная пластика и реставрация улыбки по индивидуальному плану лечения.
Авто в ОАЭ https://auto.ae/rent/car/ под ключ: продажа новых и б/у автомобилей, диагностика перед покупкой, регистрация и страховка. Прокат на сутки и долгосрок, включая премиум. VIP номерные знаки — подбор вариантов, торг, оформление передачи и сопровождение на русском.
Продаешь антиквариат? Скупка антиквариата в Москве — выгодно продать старинные вещи оценка и выкуп старинных вещей с понятными условиями. Принимаем фарфор, бронзу, серебро, иконы, монеты, часы, книги, мебель и предметы искусства. Возможен выезд и оценка по фото. Оплата сразу, конфиденциальность.
Нужен эвакуатор? эвакуатор спб быстрый выезд по Санкт-Петербургу и области. Аккуратно погрузим легковое авто, кроссовер, мотоцикл. Перевозка после ДТП и поломок, помощь с запуском/колесом. Прозрачная цена, без навязываний.
Центр охраны труда https://unitalm.ru “Юнитал-М” проводит обучение по охране труда более чем по 350-ти программам, в том числе по электробезопасности и пожарной безопасности. А также оказывает услуги освидетельствования и испытаний оборудования и аутсорсинга охраны труда.
Продаешь антиквариат? Скупка антиквариата в Москве — выгодно продать старинные вещи оценка и выкуп старинных вещей с понятными условиями. Принимаем фарфор, бронзу, серебро, иконы, монеты, часы, книги, мебель и предметы искусства. Возможен выезд и оценка по фото. Оплата сразу, конфиденциальность.
Авто в ОАЭ https://auto.ae/ под ключ: продажа новых и б/у автомобилей, диагностика перед покупкой, регистрация и страховка. Прокат на сутки и долгосрок, включая премиум. VIP номерные знаки — подбор вариантов, торг, оформление передачи и сопровождение на русском.
Авто в ОАЭ https://auto.ae/ под ключ: продажа новых и б/у автомобилей, диагностика перед покупкой, регистрация и страховка. Прокат на сутки и долгосрок, включая премиум. VIP номерные знаки — подбор вариантов, торг, оформление передачи и сопровождение на русском.
Please see my blog at https://markazahan.blogiran.net
Любишь азарт? https://everumonline.ru игры от популярных провайдеров, live-казино, бонусы и турниры. Проверяйте лицензию и правила, лимиты и комиссии вывода перед игрой. Подбор способов оплаты, поддержка и обзоры условий.
Любишь азарт? riobet casino бонусы, слоты и live-игры, турниры, платежные методы, верификация, лимиты и правила. Даем вывод, кому подходит, и чек-лист, на что обратить внимание перед пополнением и игрой. Актуально на 2025.
Read my post on https://mokamelbenzin.takblog.net
Read my post on https://ahanhub.blogiran.net/Post/39/.html
Хочешь бонусы? https://casinobezdeposita.ru бонусы за регистрацию, фриспины, промокоды. Сравниваем условия отыгрыша, лимит вывода, сроки, верификацию и поддержку. Обновления и фильтры по методам оплаты.
Top picks for you: https://theshaderoom.com/articl/how-to-avoid-scams-warning-signs-of-rogue-casino-sites_1.html
ООО «ТрастСервис» https://www.trustsol.ru московская IT-компания с более чем 15-летним опытом в разработке, внедрении и сопровождении IT-систем для бизнеса. Компания предлагает комплексный IT-аутсорсинг, администрирование серверов и рабочих станций, безопасность, телефонию, облачные решения и разработку ПО. ТрастСервис обслуживает малые, средние и крупные организации, помогает оптимизировать инфраструктуру, снизить издержки и обеспечить стабильную работу IT-среды.
More on our website: https://smartzoz.in/pages/responsible-gambling-tips-and-limits_1.html
Pastory https://pastory.app is a revolutionary educational app for kids that takes a proactive approach to entertainment. Instead of blocking content, it intelligently transforms YouTube and TikTok feeds into productive learning journeys. By using this AI-powered learning tool, parents can finally turn mindless scrolling into an enriching experience without the constant struggle over screen time.
Partnering with a specialized https://aiiimpact.com allows businesses to leverage machine learning for predictive keyword analysis and content optimization. By integrating professional ai seo services, companies can scale their organic reach faster than ever before. For businesses targeting the UK market, combining these global technologies with proven london seo services ensures that local search intent is met with surgical precision.
Experience Brainy https://askbrainy.com the free & open-source AI assistant. Get real-time web search, deep research, and voice message support directly on Telegram and the web. No subscriptions, just powerful answers.
Сдаешь экзамен? решение тусур готовим к экзаменам по билету и практике, объясняем сложные темы, даём подборку задач и решений, тренируем устный ответ. Проверим конспекты, поможем оформить лабы и отчёты.
Учишься в вузе? написание работ для студентов Разберём методичку, составим план, поможем с введением, целями и выводами, оформим список литературы, проверим ошибки и оформление. Конфиденциально, быстро, по шагам.
FarbWood https://farbwood.by команда, включающая конструкторов, менеджеров и мастеров строительных специальностей. Каждый член нашего коллектива имеет за плечами собственный солидный опыт работы в своей сфере от 9 лет. Объединив общие знания и навыки, мы постарались создать компанию, которая сможет предоставить качественные услуги частным и корпоративным заказчикам.
Строительство и ремонт https://colorprofi.ru без сюрпризов: пошаговые инструкции, советы мастеров, сравнение материалов, схемы, частые ошибки и способы сэкономить. От фундамента и стен до плитки, пола, потолков и инженерки. Обновляемые статьи и ответы на вопросы.
Бесплатные программы https://soft-sng.ru для компьютера: офис, браузер, антивирус, архиватор, PDF, плееры, монтаж видео и фото, утилиты для системы. Скачивание с официальных сайтов, краткие обзоры, плюсы/минусы и аналоги. Подбор по Windows/macOS/Linux, подборки и инструкции.
Новости Москвы https://moskva-news.com и Московской области: политика, экономика, общество, происшествия, транспорт, ЖКХ и погода. Оперативные репортажи, комментарии экспертов, официальные заявления и фото. Главное за день — быстро, точно, без лишнего.
Портал о строительстве https://strojdvor.ru ремонте и инженерных системах: от фундамента до отделки и коммуникаций. Пошаговые инструкции, сравнение материалов, расчёты, советы экспертов и типовые ошибки. Помогаем сделать надёжно и без переплат.
Мировые новости https://lratvakan.com сегодня: свежая информация из разных стран, важные заявления, международная политика, рынки и тренды. Оперативные обновления, проверенные источники и понятные обзоры событий каждого дня.
Новости K-POP https://www.iloveasia.su из Кореи: айдол-группы, соло-артисты, камбэки, скандалы, концерты и шоу. Актуальные обновления, переводы корейских источников, фото и видео. Следите за любимыми артистами и трендами индустрии каждый день.
Полезные советы https://vashesamodelkino.ru для дома и быта: практичные идеи на каждый день — от уборки и готовки до хранения вещей и мелкого ремонта. Понятные инструкции, бытовые лайфхаки и решения, которые реально работают и упрощают жизнь.
Всё о ремонте https://svoimi-rukamy.net своими руками: понятные гайды, схемы, расчёты и лайфхаки для квартиры и дома. Черновые и чистовые работы, отделка, мелкий ремонт и обновление интерьера. Практично, доступно и без лишней теории.
The best for you: https://super-sodalite-830.notion.site/tactique-du-coach-mu-analyse-des-sch-mas-de-jeu-2d033a920cac80b4a110f9f29b0b6733
Today’s Summary: informative post
Expanded article here: https://euroautorozas.com/purchase-outlook-email-accounts-instagram-advertisements-strategies-for-achievement-inside-the-2026/
Read my writings on https://sharaf.blogiran.net/extrapage/archive
Read my post on https://markazahan.blogiran.net/Post/2/Oil-stood-at-a-onemonth-price-floor.html
Нужна косметика? набор корейской косметики для лица большой выбор оригинальных средств K-beauty. Уход для всех типов кожи, новинки и хиты продаж. Поможем подобрать продукты, выгодные цены, акции и оперативная доставка по Алматы.
Current recommendations: http://www.vendingsolution.it/?p=443517
Details inside: http://mba-msu.ru/ckfinder/pages/?kak-obmanyvayut-kazino-realnye-istorii_2.html
Read my post on https://www.najiblog.ir/
Нужна косметика? проверенная корейская косметика большой выбор оригинальных средств K-beauty. Уход для всех типов кожи, новинки и хиты продаж. Поможем подобрать продукты, выгодные цены, акции и оперативная доставка по Алматы.
The best reads here: https://moldovanews.md/wp-content/pages/kak-vybrat-luchshie-turniry-v-onlajn-kazino_2.html
Born of Trouble is a story that proves that even the darkest nights must end in dawn. This hopeful and inspiring narrative is now available in a convenient pdf format. Let the journey of these characters give you the strength to face your own. https://bornoftroublepdf.site/ Born Of Trouble Chapter 1 Pdf
работа подработка подработка на выходные
Read my writings on https://ahanhub.blogiran.net/extrapage/archive
Товар дня – обзоры мебели https://hotgoods.com.ua
Компания пассажирские перевозки https://gortransauto.ru
Unlock the Is This a Cry for Help PDF today. This digital file is great. Get the copy now and start reading. https://isthisacryforhelppdf.site/ Is This A Cry For Help Ocr Pdf
Read my writings on https://markazahan.blogiran.net/extrapage/archive
اطلاعات تکمیلی درباره کاپیتال پلاس عزیزی هد مدیریتی شرکت های خدماتی در ایران
студия дизайна интерьера дизайн агентство
дизайн студия дизайнер дизайн бюро петербург
Сексуальный контент широко доступен на специализированных
платформах для зрелой аудитории.
Выбирайте гарантированные источники для обеспечения безопасности.
My web blog: BUY VIAGRA
View My Blog – I feel like you explained exactly what I’ve been thinking.
Нужен трафик и лиды? разработка сайтов в казани SEO-оптимизация, продвижение сайтов и реклама в Яндекс Директ: приводим целевой трафик и заявки. Аудит, семантика, контент, техническое SEO, настройка и ведение рекламы. Работаем на результат — рост лидов, продаж и позиций.
Нужен трафик и лиды? https://avigroup.pro/kazan/seo-optimizacziya-sajta/ SEO-оптимизация, продвижение сайтов и реклама в Яндекс Директ: приводим целевой трафик и заявки. Аудит, семантика, контент, техническое SEO, настройка и ведение рекламы. Работаем на результат — рост лидов, продаж и позиций.