
What is the difference between a mix that sounds muddy and undefined and another that sounds crystal clear with definition and intelligibility? The difference is in the EQ.
While often misunderstood, equalizers are the bread and butter of good sound reinforcement. Knowing the basics of EQing is one of the most critical aspects of running the mixing console. EQ lets you correct problems and/or enhance the sound, making your mix cohesive.
In part 1 of this subject, we’ll learn about the EQ tools available to us on most digital consoles and how they function.
In part 2, we’ll learn about about frequencies so that you know exactly what it is that you are manipulating as you sculpt a musical, well defined, clear and present live mix.
In part 3, we’ll learn how to apply your EQ tools to specific instruments, vocals, and live sound reinforcement applications to create a stellar sounding mix.
Let’s dive in!
The High Pass Filter (or Low Cut Filter)
A high pass filter, often abbreviated HPF, allows the signal above a selected frequency to pass through unaffected while removing the signal below that frequency, which are the low frequency sounds.
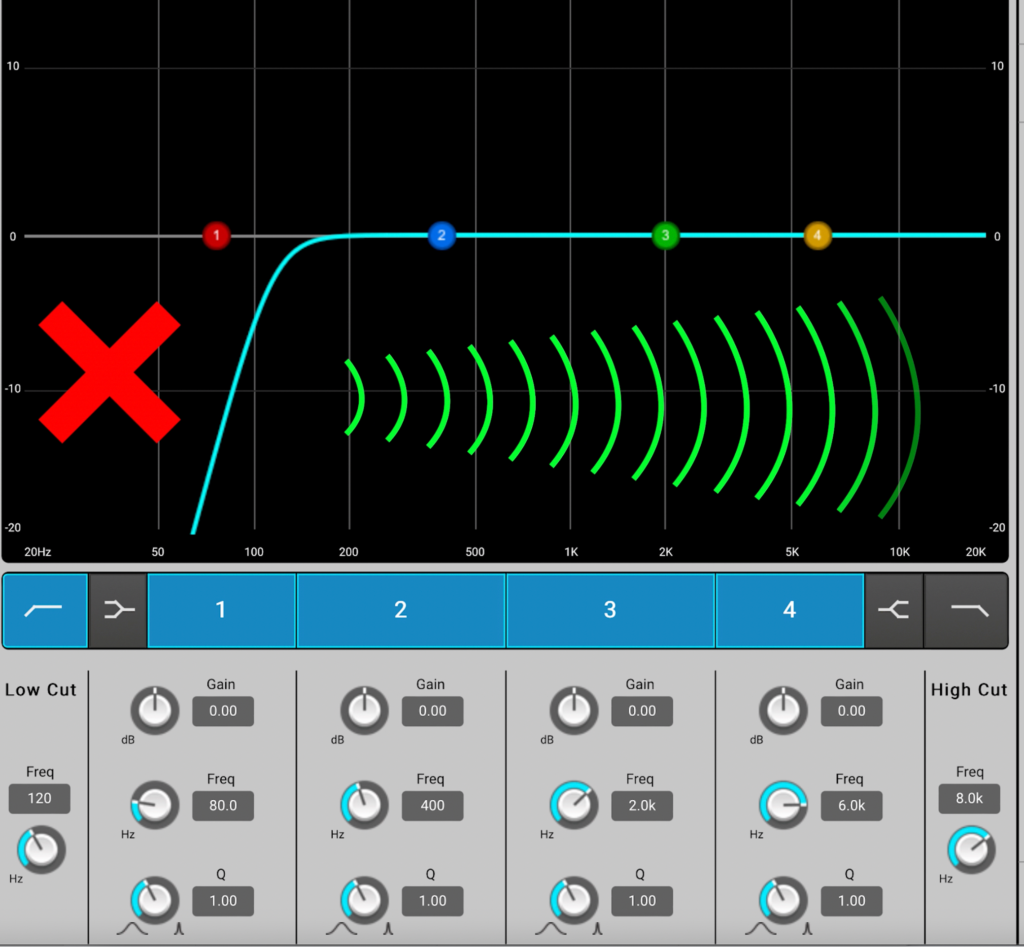
This tool is especially important in creating a clear and present mix when many elements are competing for similar low frequency space. In fact, many sounds don’t need much low end at all to sound full and present in a mix. If you find 2 instruments fighting for the same frequency band, consider high passing one of them to make room for the other.
Every instrument operates within a specific band of frequencies. Using a high pass filter, you can remove the frequencies that an instrument does not produce. For example, an average pop singing male voice operates from about 100 Hertz. I can use a high pass filter to remove the frequencies below 100 Hz. Getting rid of the unneeded low frequency content allows for more intelligibility of the vocal. You can always adjust it later.
A high pass filter cleans up any unwanted noise that should not be reinforced like low frequency energy from air conditioning, wind, traffic noise or as it happens at one of the music venues where I run sound, airplane noise.
Plosive “P” pops in a microphone can be annoying. Use a high pass filter to mitigate their effect.
Any time you run a microphone through a loudspeaker in the same room, there’s a chance for feedback. Low frequencies, typically below 200 Hz, are omnidirectional. So, if you put a loudspeaker facing away from the microphone the first frequencies that might start to feedback are low frequencies. High pass filters ensure that you get maximum gain before that low end feedback occurs.
The Low Pass Filter (or High Cut Filter)
A low pass filter, often abbreviated LPF, allows the signal below a selected frequency to pass through unaffected while removing the signal above that frequency, which are the high frequency sounds.
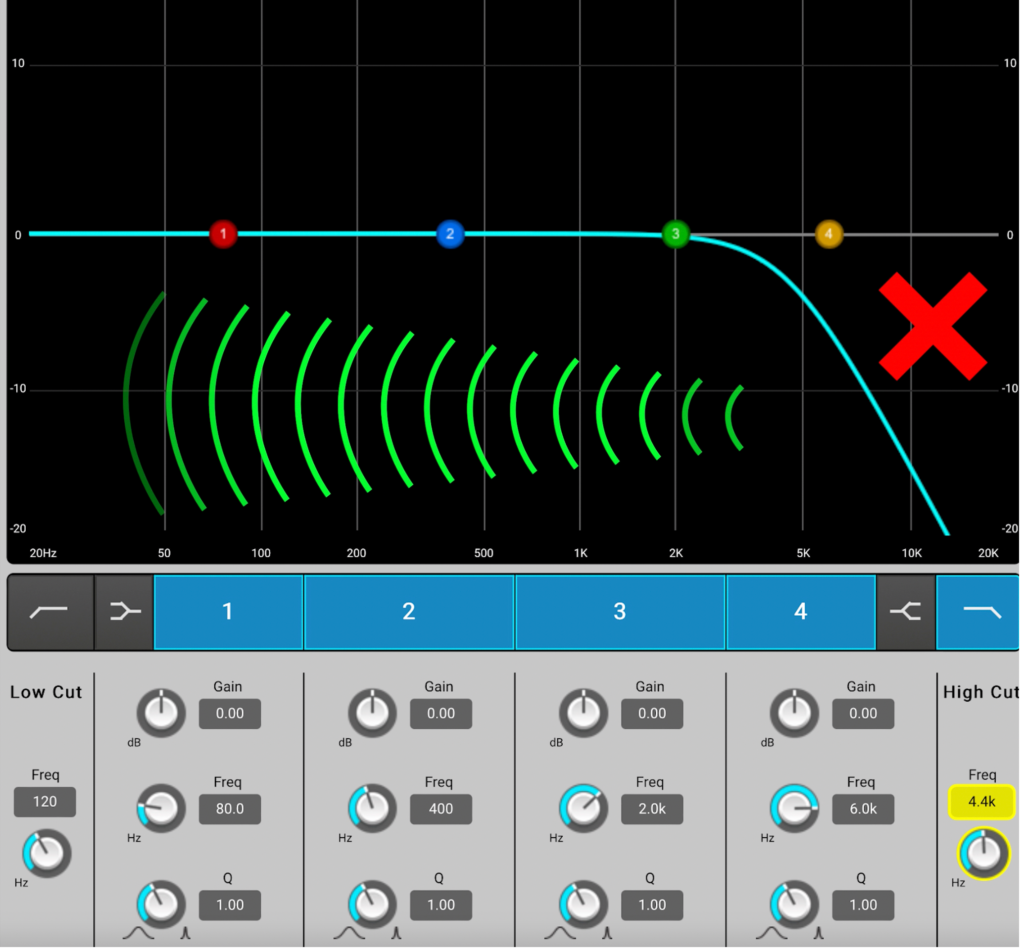
On an instrument channel, a low pass filter is useful in filtering out unwanted high frequency content from a signal; for example, cutting out some of the piercing high tones of a flute or cutting out the shrill sound of a violin bow passing over the strings.
Sometimes instruments clash. For example, a drum kit and an acoustic guitar: These two instruments seem like they might serve completely different functions. However, they can compete for attention in the treble range, especially an acoustic guitar player who strums aggressively; often conflicting with the hi-hat or cymbals. Here, we can use a low pass filter to help one instrument move out of the way of another.
For both the high pass filter and the low pass filter, there are 2 parameters to adjust.
Frequency: Often referred to as “cut-off” frequency, this is the point at which the filter begins to attenuate (decrease level).
Slope: Determines the rate of the attenuation. This is a fixed amount on most digital mixing consoles so you may not see a control for this.
A Shelving Filter
A shelving filter, also referred to as a shelf filter, shelf EQ, shelving EQ etc. increases (boosts) or decreases (attenuate/cut) the volume level of frequencies equally below, or above, a selected frequency. A shelving filter which boosts or attenuates the high end of the frequency spectrum is known as a ‘high shelf’. Whereas a shelving filter which boosts or attenuates the low end of the frequency spectrum is known as a ‘low shelf’. When you look at the result on the display it resembles a shelf, hence the name.
There are three parameters to a shelving filter:
Gain: Used to control the amount of boost or attenuation to be applied.
Frequency: Defines the point at which frequencies above (high shelf) or frequencies below (low shelf) are cut or boosted.
Slope: The size of the transition band over which the gain change is applied. This is a fixed amount on live mixing consoles so you won’t see a control for this parameter. Once the full amount of gain is reached, the gain change remains constant all the way to the top or bottom of the frequency spectrum.
Because it has fewer controls, a shelving EQ limits you to just tailoring the basic timbral qualities of a sound; whether adding a little bit of a high-end sparkle or some extra bass-end weight.
A quick note here; I’ve worked on several models of mixing consoles that did not feature low pass filters and shelving filters on the input channels. In any case, you will find low pass filters and shelves on all input channels of QSC’s TouchMix mixers.
The Parametric EQ
The parametric EQ is a mainstay of recording and live sound because it offers continuous control over the audio signal’s frequency content.
The parametric EQ on an input channel of most digital mixers will offer four frequency bands. Buses (auxes) and subgroups may offer up to seven frequency bands. Of course, every mixer is slightly different and features will vary.
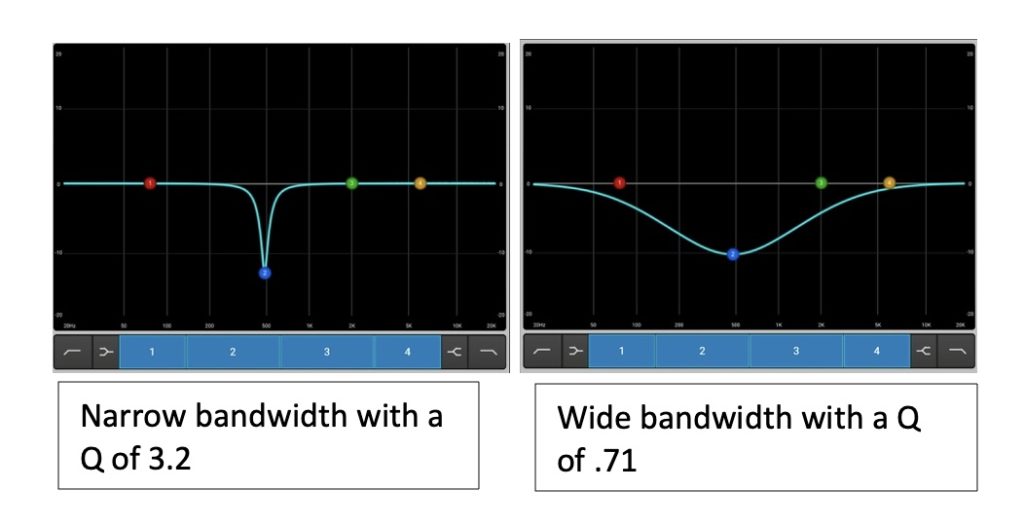
On each frequency band of a parametric EQ, there are three important parameter controls: gain, frequency and bandwidth/Q.
Gain determines how much is being boosted or cut.
Frequency, just as it sounds, determines which frequencies are being boosted or cut. The primary selected frequency is referred to as the “center frequency” or “EQ center point.” When selected, you can sweep the center frequency across the spectrum.
Bandwidth, also referred to as Q, adjusts how wide or narrow is frequency band you affect. The broader the Q, the more frequencies will be affected by the adjustment. The narrower the Q, the fewer frequencies will be affected by the adjustment. Bandwidth is what allows such precise control of an audio signal’s frequency content. This is what makes an EQ parametric.
On a side note, though bandwidth and Q are often used interchangeably, they are not one and the same! They’re related, but they’re in fact inversely related. This simply means that as one goes up the other goes down. So, as bandwidth increases, Q decreases. As bandwidth decreases, Q increases.
When using a parametric EQ on an instrument or vocal channel, there are two methods to manipulate the tonal quality of a sound.
- Additive EQ: boosting frequencies to achieve the results you want.
- Subtractive EQ: cutting offending frequencies out.
There’s plenty of debate about whether it’s better to do one or the other but in the real world of fast and furious live mixing, I have learned to choose whichever approach is the most direct route with the least moves possible to my destination.
For example, if I only need to cut one narrow range, then boosting every other filter is less transparent than using a single filter to cut the main offender. On the other hand, if all I need to do to make a sound pop is boost one filter, cutting everything else and applying makeup gain is not the quickest route.
Get Ready to Put Your EQ Tools into Practice
While the EQ concepts are the same, every digital mixing console will have their own solutions to access these controls. If you’re unfamiliar with where these controls are on your mixing console, I would suggest looking it up online and then practice accessing and making EQ moves. Use your favorite music and listen to the changes being made as you practice with the EQ controls.
In the real world of live audio mixing where one may find themselves working with different personalities of musicians and constrained sound check times, speed is essential. Developing muscle memory when accessing these controls instills confidence in the person operating the mixing console allowing them to concentrate on sculpting the sound rather than where to find the controls.
Now that we understand how our EQ tools function and how they operate, it’s time to apply them to create a clear, distinct and present mix.
Stay tuned for part 2 of “How to Create a Clear and Present Mix Using Your EQ Tools.”
Golden Preciado
Latest posts by Golden Preciado (see all)
- The Sound Behind the Scenes: The Psychology Behind Navigating Personalities - April 8, 2025
- Making the Transition from Floor Wedges to In-Ear Monitors - October 22, 2024
- Lavalier (Lapel) vs Headset Microphones - August 5, 2024
Thanks