The best speakers in the world are not going to sound great if they are not located in the proper position and aimed correctly at the audience. The goal of a cinema sound system is to provide the best possible sound to a large number of people. Each seating location should have a similar audio experience as far as volume level, dialog intelligibility and frequency response. While perfection is an impossible goal, it is possible to get very good results by paying attention to details when locating and aiming Screen Channel loudspeakers.

Improper mounting location of screen channels is one of the most common causes of significant front-to-back volume level variation–for example, too loud up front and too soft in the back. Improper aiming can cause poor dialog intelligibility by directing too much sound onto reflecting surfaces (walls, etc,) and reducing the full frequency coverage to many seats. While extreme seating locations (like the sides of the front row) will always be a challenge, it is possible to get excellent coverage of most of the seats in an auditorium.
Proper Location of Screen Channel Speakers
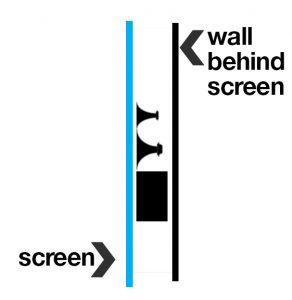
The front of the speakers should not be too far from the back side of the screen. More than about 6 inches (15 cm) can cause reflections and excessive HF attenuation. High Frequencies reflect off the back of the screen, bounce off the wall behind the screen, then back through the screen with delay, causing speech intelligibility problems. Acoustical absorption (fiberglass duct liner) on the wall behind the screen is critical. The best solution is to mount the speakers in a full baffle wall with acoustical absorption. Bafflettes can help if a full wall is not possible.
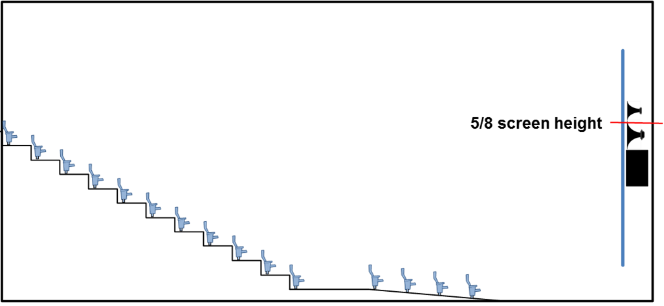
The height of the speakers is dependent on the screen size and placement. The DCS 3-way and 4-way speakers should be placed so the junction of the mid and high frequency horns is at 5/8 of the screen height. On a common width screen, it is advisable to average the image height of the 1.85 and 2.35 images. The speakers are a little high for 2.35 and a little low for 1.85 images. Always be sure the Left and Right speakers are not obscured by masking material unless is it acoustically transparent.
Vertical Aiming
QSC loudspeakers have built-in aiming angles to reduce the tilt and keep the front of the horn more parallel to the screen. This reduces the destructive reflections from the back of the screen.
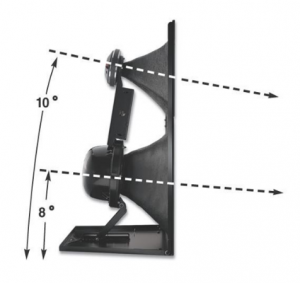
The vertical coverage angle of QSC 3-way and 4-way screen channels is about 50 degrees, 20 degrees up and 30 degrees down. The front rows are usually well within the coverage angle as long as they are not too close to the screen.
Take this built-in 10 degree tilt into account before deciding to adjust the aiming of the horn. In many cases, when the speaker is at the correct height, minimal or no additional vertical tilt will be required. Especially steeply-raked stadium seating or sloped floors are likely to need some adjustment.
QSC screen channels feature our patented CineSight, making it very easy to aim speakers even after the screen has been installed. There is no need to remove drivers to aim the speaker.
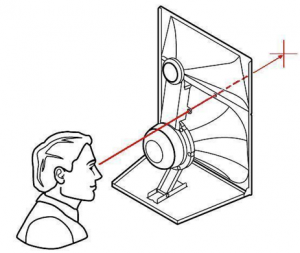
If the screen has already been installed, dim the room lights and place a flashlight at the desired aiming point in the room, usually at the middle of one of the back couple of rows in a typical cinema. The position of the light will be visible through the screen perforations. Use CineSight to aim the horn at the light.
Important Tips
Important tip #1: Always be sure to properly tighten all horn mounting and adjusting screws to prevent rattles and to prevent vibration from causing the alignment to shift.
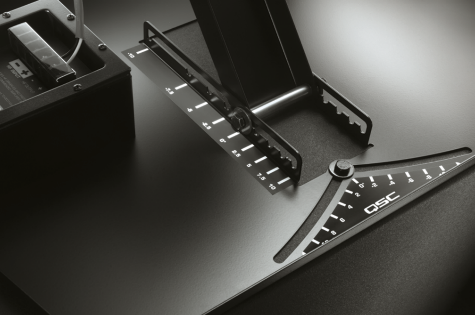
Important tip #2: If you are satisfied with the aiming in one of several identical rooms, you can duplicate the adjustments in the other rooms by using the angle scales on the cinema horn pan and tilt mechanism.
The CineSight aiming axis is directed exactly perpendicular to the horn mouth. Due to the built-in down angle of the horns, aiming is correct in most stadium cinemas when the CineSight aim point is near the last few rows of seating in the room. It is important to check the coverage in the front row by playing pink noise and checking to see if the high frequencies drop off too much. If they do, a little more down tilt may be required. Also, check the back row to be sure it is well-covered at high frequencies in exceptionally steep rooms.
Important tip #3: If you have CAD drawings for the room, you can use the +20 degrees and -30 degrees coverage pattern to check if adjustment is likely to be necessary and calculate a good starting point for any adjustments if they are needed. This reduces “trial and error” time on site.
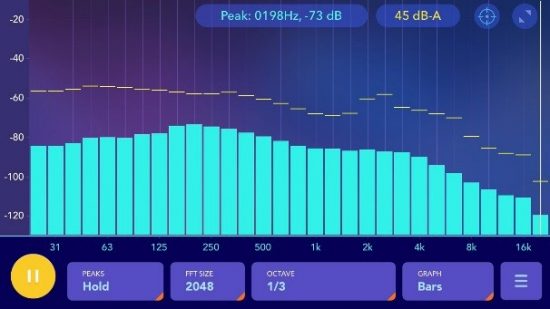
Important tip #4: There are many free Real Time Analyzer apps for mobile phones. Since you are not doing calibrated adjustments, these can be very helpful to check coverage as you walk around the room listening to pink noise. The SPL meter function can be used for quickly checking front to back volume levels and the RTA display shows the roll-off, if any, of high frequencies.
Horizontal Aiming
Aiming the horns in the horizontal direction is called “panning”. Vertical is “tilt”, so a “Pan and Tilt” bracket is one that allows adjustment in both the horizontal and vertical planes. In most cases, the center channel is in the middle of the room and needs no horizontal aiming. The pan adjustment is set at zero degrees. An unusual asymmetric room could require horizontal aiming of the center channel but that is the exception rather than the rule.
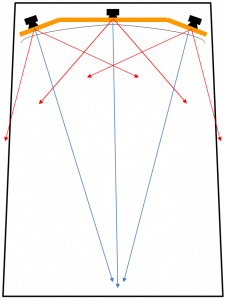
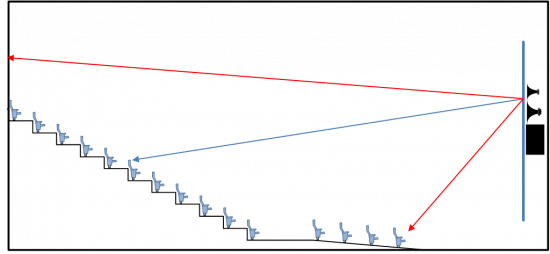
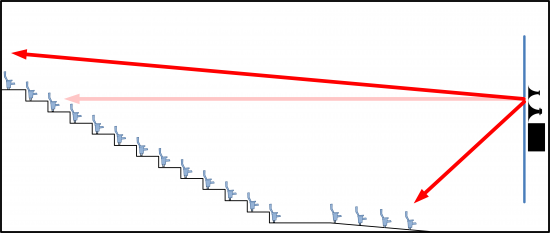
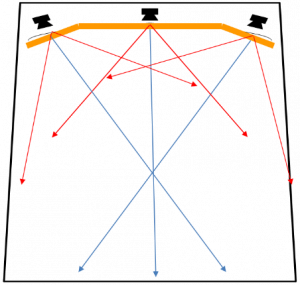
The horizontal coverage angle of QSC 3-way and 4-way screen channels is about 90 degrees. The front rows are usually well within the coverage angle as long as they are not too close to the screen. For a longer auditorium, aiming the speakers at the middle of the back row is usually a good starting point.
For a wider auditorium, the aiming point for the left and right speakers should shift more towards the opposite corners of the room.
Finishing Up
Once you have completed the aiming process, walk the entire room from front to back and left to right with pink noise playing and listen for any fall-off of high frequencies. You may need to make slight adjustments in aiming to be sure all seats are evenly covered. As noted in Tip #4, a mobile phone RTA app is helpful for checking high frequency coverage. It is critical to complete the aiming process before any EQ and level adjustments are finalized.
Once you have done this a few times, it gets easier and faster to accomplish. Remember that identical rooms can be aimed by matching settings on the pan and tilt adjustments. Getting aiming and placement right is the necessary first step towards great sound, and with QSC Screen Channel Loudspeakers, it’s really not difficult!
Barry Ferrell
Derniers articles parBarry Ferrell (voir tous)
- Cinema and Pro Audio: A Comparison of Loudspeakers - July 6, 2021
- DPM=Three in One - June 16, 2021
- All Subwoofers Are Not Created Equal - May 6, 2021