When mixing live audio, one of the biggest mistakes a sound operator can make is aimlessly applying EQ without intentionality due to of lack of understanding. In this article, I will walk you through a process to follow when using your EQ to manipulate these frequencies, so that you can create a musical, well-defined, clear and present live mix.
In Part 1 of this subject we discussed how your EQ tools function. In Part 2, we discussed what frequency is. I would encourage you to read these two previous articles before diving in to this one.
Filter Out Unnecessary Frequencies
Your high pass filter (low cut) is your best friend when it comes to filtering out unnecessary low end frequency content. Review how a high pass filter (HPF) (low cut) works here.
In general, you can start by setting your high pass filter to the lowest note that an instrument is capable of producing. This is why it’s so important to know the frequency ranges of the various instruments that you’re working with. So, keep this “Instrument and Vocal Frequency Range” chart and/or search on the internet if you don’t have these memorized.
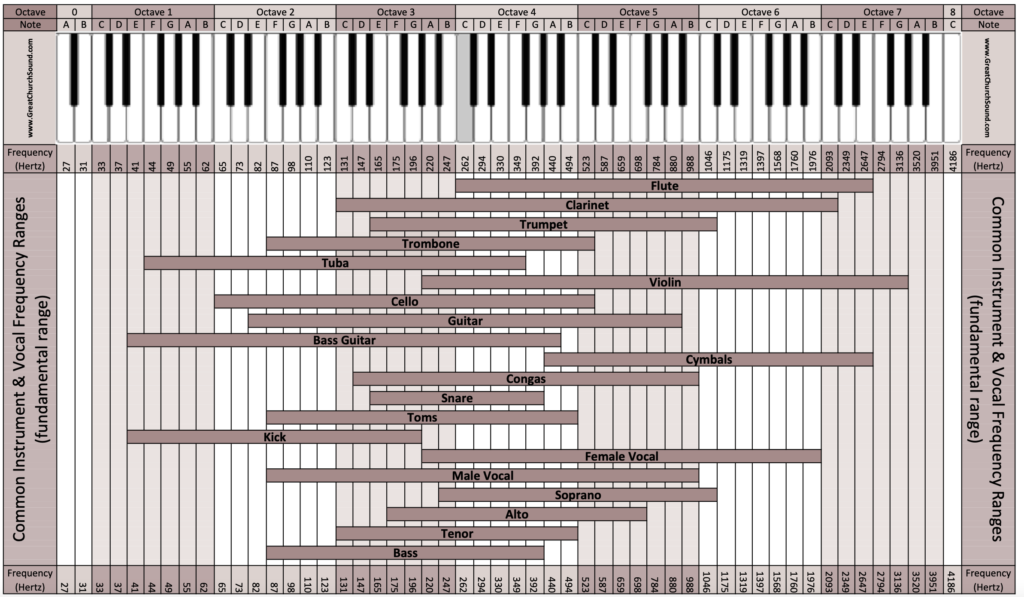
Some instruments like piano and keyboards are full range instruments but won’t necessarily be played in their full range. Generally, I will start with a high pass at 100 Hz until I can determine how they are being used in the musical arrangements.
Vocal ranges will vary depending on the style of music and whether it’s a male or female voice. So, generally, I will start with a high pass at 100 Hz on all vocals until I can determine how they are being used in the musical arrangements.
These may not be the final resting place for all my high pass filters, but it’s where I will start. Most probably, you’ll find yourself using high pass filters on the majority of your input channels. Setting your high pass filters will automatically create a great deal of clarity and intelligibility as it eliminates extraneous noise for example HVAC, stage volume and other ambient low end noise from being unnecessarily amplified.
Your low pass filter (high cut) is another useful tool in filtering out certain unnecessary high frequency content. Review how a low pass filter works here.
In general, we want to keep as much high frequency content as possible as it lends to clarity, definition and intelligibility. However, certain instruments can produce a high-end shrill tone that can be overwhelming if left alone, for example, a piccolo, flute, violin and some female soprano voices. In these cases, I will lower the low pass filter (high cut) until the unpleasant shrill tone subsides. Use your ear to determine this.
Cut First, Boost Second
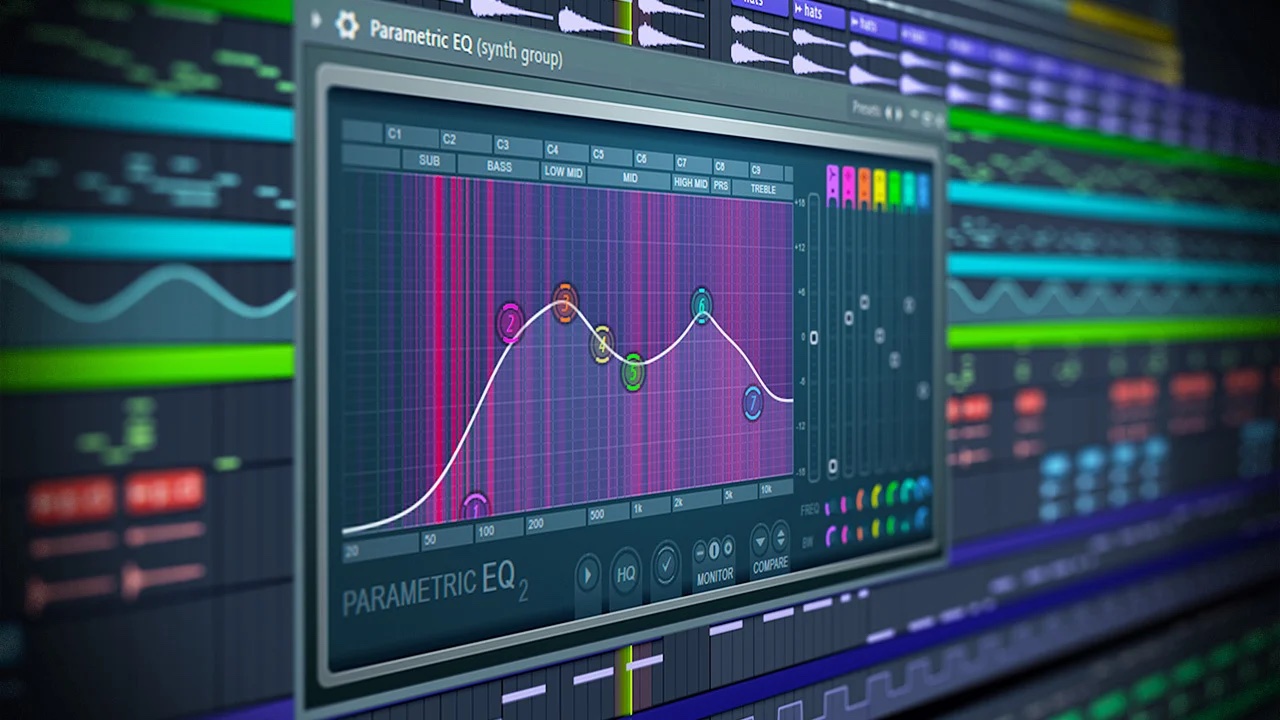
We will use our parametric EQ to mold and shape the sound of each instrument in our mix. Review how a parametric EQ works here.
While boosting frequencies are easier to hear, this can cause problems if you boost the presence in every channel causing a harshness to your mix. Furthermore, if you’re not careful, it’s possible to overload the EQ gain stage, which introduces distortion to your mix.
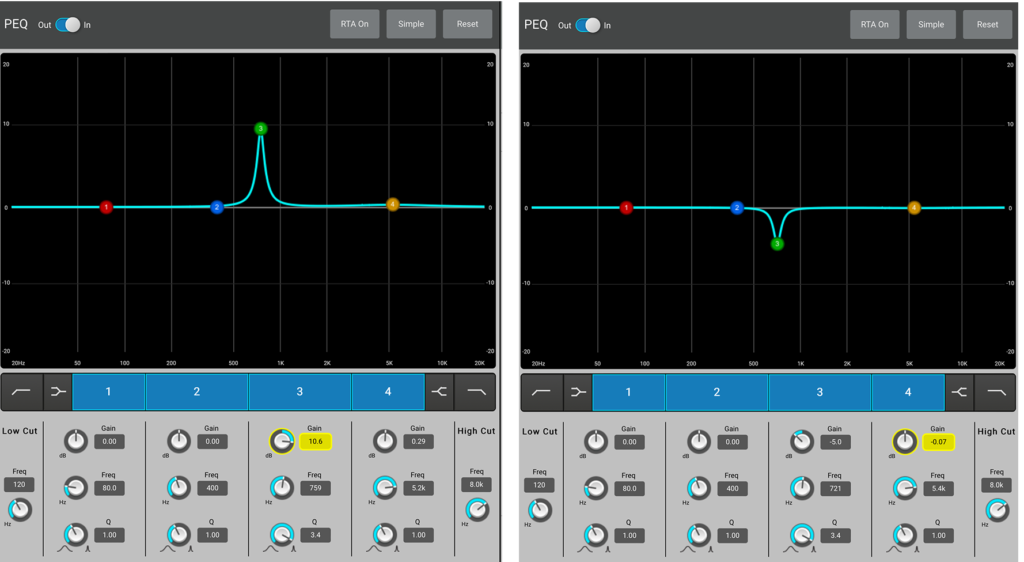
If you cut out offending frequencies first, then you will find that often you don’t have to boost anything. Always start by listening for problematic frequencies and then reduce those first.
But what if you’re not exactly sure where the offending frequency is? Then you can apply the “Boost, Sweep and Cut” method to identify the problem. Start by placing your frequency center point where you believe the problem is. Using a narrow cue, boost the frequency center point about 5 to 10 dB. Sweep it across the frequency spectrum until you hear the apparent nasty tone and then cut that frequency until the unpleasant tone is gone. You can then choose whether to widen the cue or not.
Use the “Boost, Sweep and Cut” method with care when mixing in a live sound application as microphones can easily feedback in the monitors while in the boosting phase.
Once you have identified and cut the unpleasing elements, then you can ask yourself, “What can I boost that will make this instrument stand out even more in the mix?” For example, 2 to 3 kHz on an electric guitar allowing it to shine, or 3 to 5 kHz on a kick drum to allow the punchy sound of the beater to be heard.
Focus On The Overall Mix
Once all initial EQs are in place then it’s time to focus on the overall mix and massage each element into place.
A common problem that occurs in so many mixes that I hear is what’s called frequency masking. A sound person wants a heavy bass sound and boosts the bass, lows and low-mids everywhere thereby masking so many of the high frequency sounds that make a mix intelligible.
On the other hand, another common problem is the sound person that boosts the same high frequencies in every channel thereby creating a harsh and piercing mix.
The goal of your overall mix is that no particular portion of the frequency spectrum should be over emphasized but rather to achieve an even presence from low to high frequencies. We do this first, through range allocation and second, through channel volume placement.
Range allocation of instruments means allowing your instruments to live in their own frequency space. (If you’ve set your high pass filters (low cut) properly, you’re already half way there to creating wonderful range allocation in your mix.)
For example, the kick drum and bass guitar live in bass and low range. Guitars and piano keyboards are generally low mid to mid-range instruments. Vocals are generally mid to upper mid-range. The idea is not to over emphasize frequencies that cross into another instrument’s frequency range.
Obviously, this may look a little different for each band as they will have their own unique song arrangements. Experienced musicians playing well arranged music are already applying excellent range allocation in the musical arrangement. These mixes generally come together quite easily. The sound person needs only to cut and boost a few frequencies to enhance certain tones in each instrument.
You may find in other musical arrangements instruments playing in the same frequency range which causes a lack of definition in the individual instruments. In this case the mix engineer can help create distinction with EQ.
For example, if a piano player is banging on the low notes of the piano where the bass guitar is playing, raise the high pass filter (low cut) on the piano until those low notes are no longer stepping on the bass guitar. If you have two keyboards fighting for the same frequency space, you can apply a low pass filter (high cut) to one keyboard allowing the other to occupy more of the high frequency space. If you have two electric guitars playing in the same range, you might choose to use a 3 kHz boost on one, but a 3 kHz cut on the other. In a full band situation, you may need to raise the high pass filter (low cut) on an acoustic guitar and perhaps add a 5 kHz boost, so that it’s not being masked by other instruments occupying that same range.
Channel volume placement using your mixer’s faders is the next step in creating an even mix. This is not a passive or “set and forget” process. When the sound person is listening closely to what the musicians are playing, they may find themselves adjusting the volume placement of instruments all throughout a song. For example, when an instrument plays a solo or when a lead vocal becomes a background vocal. Needless to say, it’s important for the sound person to keep their eyes and ears attuned to what’s happening on stage.
Vocals Take Precedence

If your mix includes vocals, then your vocal tone needs to be perfect. Humans, by nature, tune into voices and listen to them predominantly. A small vocal problem will stand out more than a serious flaw elsewhere in the mix. Here are suggestions for EQing vocals:
BODY (200-500 Hz)
This is the frequency range responsible for warmth. Warmth is good but too much can make vocals boomy or mushy. Create instant clarity by removing muddiness (200-500 Hz)
NASAL (1-3 kHz)
If your singer sounds like a childish cartoon character, then cut this frequency range. Don’t go overboard though, or you will go from sounding like a cartoon character to having a serious head cold.
PRESENCE (4 kHz)
Presence is the key ingredient to intelligibility. If your vocals aren’t standing out, cut 4kHz in guitars and other instruments. This will make room for vocals in the mix. Adding some 4kHz can add presence, but do it judiciously, since your vocals may end up harsh if you add too much.
SIBILANCE (5-8 kHz)
Sibilance is the greatest vocal offender. “Esses” and other high-frequency sounds are obnoxious in speech. While de-esser is the best tool for the job, a prudent cut between 5 kHz and 8 kHz is often all it takes.
Instrument and Vocal Presets
If you’re mixing on a QSC TouchMix mixer, you have access to QSC’s library of instrument and vocal channel presets. These presets were created by world class engineers in actual live sound environments to maximize not only great sound but system stability. Much of what I’ve discussed in this article is embodied in these presets.
Loading QSC’s instrument channel presets will help a less experienced engineer achieve great sound quality and help an experienced engineer with a great starting place so they can dial in a mix quickly.
I highly encourage aspiring mix engineers to not only use QSC Instrument Channel Presets but to study them as well. They are a wonderful teaching tool. Learn more about QSC Instrument Channel Presets here.
The Most Important Mix Element of All
The most important element to creating a clear and present sounding mix is your ear. As you are applying your EQ tools, make you’re mixing decisions based on what you hear and not by what you see on the mixing console.
Mix with intentionality. If you don’t know why you are making an adjustment, then don’t do it.
Learning how to apply these concepts takes time and practice. Give yourself grace as you’re learning and enjoy the journey!
Golden Preciado
Latest posts by Golden Preciado (see all)
- The Sound Behind the Scenes: The Psychology Behind Navigating Personalities - April 8, 2025
- Making the Transition from Floor Wedges to In-Ear Monitors - October 22, 2024
- Lavalier (Lapel) vs Headset Microphones - August 5, 2024
Love your tutorials, Golden!
Very helpful. Thanks! I tend to use my pan control with similar sounding instruments, gently, to spread out the mix.
New user tm16. Have run sound for many years
Golden…..
Thanks
Question about multing….I have a keyboard that has only one out.
The player is at times heavy left handed.
This is a band with no bass player.
I’m thinking of multing the keyboard into 2 channels. 1 for left side, or the bass line.
Another for right side.
I’m seeking guidance for implications…
Respectfully
Scott Nagel
Great article. keep up the good work sir.
Great article.
Fantastic advice. After 40 years of live audio I know first hand that these simple truths are the basics of a good mix… live or studio.
WOW !! You are a GREAT TEACHER!!!!!!!