
Five more ways Q-SYS makes cinema life easier
Let’s talk about some potential use cases for the recently released Christie plugin. This discussion won’t cover the entire spectrum of possibilities for the plugin but hopefully it can lay a foundation and maybe inspire some new creative uses. Feel free to utilize the comment section of the blog if you cook up something interesting.
If you are new to the concept of plugins for the Q-SYS Ecosystem, open up Q-SYS Designer software and jump into the Asset Manager menu by clicking Tools -> Show Asset Manager. You will find a library of software add-ons that can enable a Q-SYS Core to integrate with third-party AV devices. Think of Asset Manager as the equivalent of the App Store on an iPhone – or the Play Store if you’re one of those unfortunate android users. In this list you can find and install the Christie Digital Cinema Projector Series2 plugin. Once installed, it will populate in the Plugins section of the Schematic Library and can be pulled into any Q-SYS design.
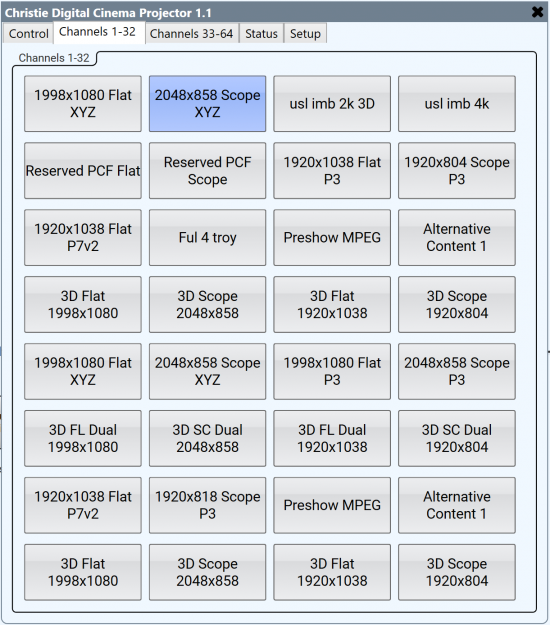
At a glance you will see that the Christie Digital Cinema Projector Series2 plugin has an oddly familiar look and feel with menu tabs for Setup, Control, Channel Recalls (1-64) and Status. What’s nice about this plugin is that we get bi-directional communication to the projector. This means we can control the projector from Q-SYS but can also have visibility on changes made externally. So, whether you are controlling the projector from the attached touch panel controller, another automation device, or from a Q-SYS UCI, all the current settings shown within the plugin will be in sync with what the current state of the device is.
Another small but nice feature you will see is that string labels for all the defined channels will auto-populate atop the buttons that recall them.
Use Case #1 – Audio Format Recall
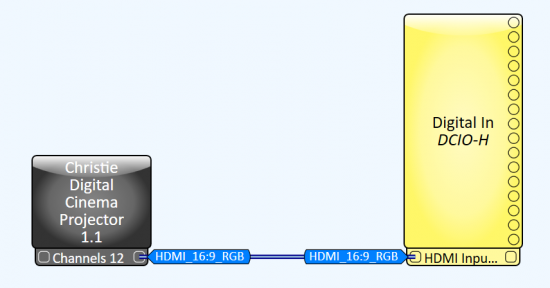
Let’s start with an easy example. Say we want to have the DCIO-H receive and decode the HDMI audio bitstream whenever the projector is in its HDMI channel and go back to receiving 16ch AES3 whenever it’s in a channel formatted for DCPs. All that’s needed to pull this off is to expose the Control pins for HDMI Input Enable on the DCIO-H and the corresponding HDMI channel on the projector (CH12 in my example). You can link one pin to the other with either a wire tag or direct wire.
Now, whenever CH12 is active on the projector my DCIO-H will switch to HDMI audio receiving and AES3 when it’s not.
Use Case #2 – Emergency Life Safety Automation
Instead of reading the state of the projector and acting upon it, here we will be going the other direction. When the state of the GPIO input on our Q-SYS Core changes we want to tell the projector to do something. Let’s utilize one of the many GPIO inputs on our Q-SYS Core to receive the dry contact input from an emergency alarm system and use it to control our projector.
First click the Q-SYS Core component and change its GPIO-1 type from its default value of Digital TTL to Contact Closure Input

Next, we can expose the Douser Close, Lamp Off, and Media Server Pause control pins on the Christie plugin and connect those to the GPI-1 pin of the Core.
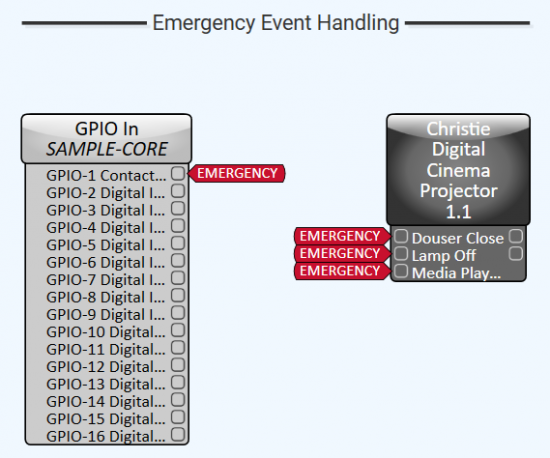
It’s probably a good idea to take this a step further and link the same Emergency wire tag to System Mute on the Q-SYS Core as well just to be sure no program audio is playing during an alarm.
Use Case #3 – Linked Masking Control Stops
Few things are more embarrassing than having the masking set for the incorrect picture aspect ratio. Wouldn’t it be nice to guarantee that our projector channel always lined up with the correct masking stop? This would mean one less cue to remember to add in show playlists and it would remove a potential source of error for presentation.
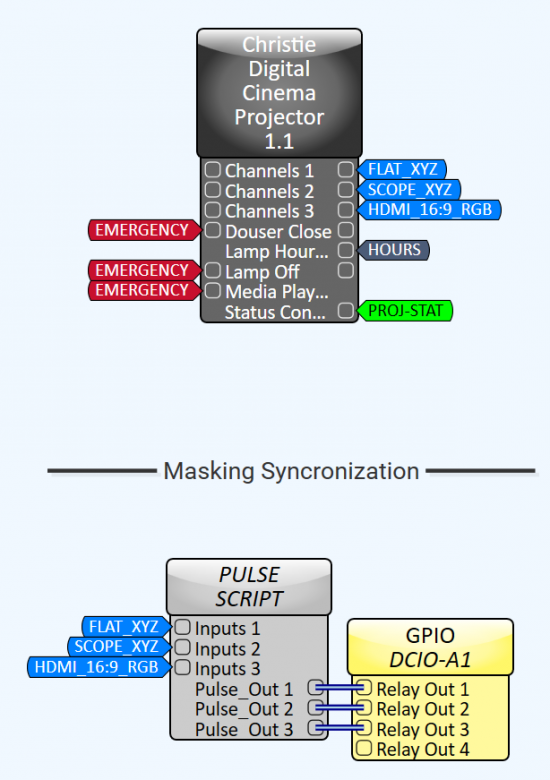
In this example, I have exposed the control pins of the Christie plugin component for Channels 1, 2, and 3 from the Properties pane and labeled them accordingly. Let’s pretend that we have a masking motor with at least three stops for this one. Ultimately, we want the current state of the projector channel to act upon the Relay Outputs we have on the DCIO device in our design. But first we must add a bit of custom logic to the design.
In the screen cap, you can see a third component in the design in between the Christie plugin and GPIO component. The job of the Pulse Script block controller is to turn a Boolean (TRUE or FALSE) value into a momentary pulse with a defined duty cycle. If we didn’t have this and just connected the blue control pins directly to the Relay Outs, then we would have a constant HIGH output and the relays would never return to their normally open state.
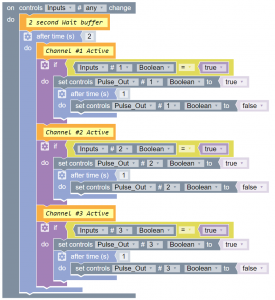
With everything wired together this is how things function. Notice the chain of control function follows the visual order of the control pin. A channel state on the projector changes, causing the PULSE script input to change. The state is then converted to a momentary pulse output for the physical relay outputs on the rear panel of the DCIO.
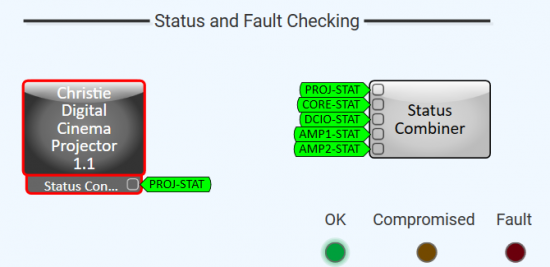
Use Case #4 – Status Monitoring
The Status Combiner is a great component for aggregating multiple devices status and displaying the total system status in one spot. If there are faults within the stack then the worst of them will filter up. In our sample cinema 7.1 design we use a Status Combiner to collect the status of the Core, DCIO, and two amplifiers. Now with a projector plugin we could add that device into the Status Combiner component as well. Make sure you expose the Connection Status pin to get the most verbose readout. If there are any projector faults or tamper errors thrown they will be collected now. This could be particularly useful if you are operating a boothless complex where physical projector access is difficult.
Use Case #5 – Lamp Hour Checks
Lastly, we can create our own lamp replacement warning system.
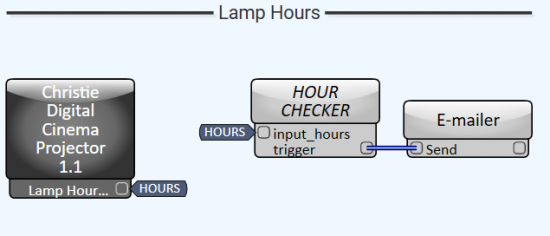

First, find the Lamp Hours Used pin in the plugin properties and expose it. Next I’ve tied it to an HOUR CHECKER script which is a simple block controller function that triggers a TRUE value when our threshold value of hours has been reached (900hr in the threshold chosen in the example). I chose to use an equals (=) operator so that multiple warnings wouldn’t spam the inbox after 900hr threshold had been reached. If greater than or equal to (=>) was used, then hours 901, 902, 903, etc.. would result in more email alerts. There’s definitely potential for more complex logic in this script but I’m keeping it simple for now.
As you can see, with a Plugin like this the possibilities are numerous, and the only limit is your imagination. Expect more cinema-related Plugins from us soon, and I hope you’ll share your ideas on how you might utilize them in your applications.
Remember, we are here when you need us and are always glad to be helpful.