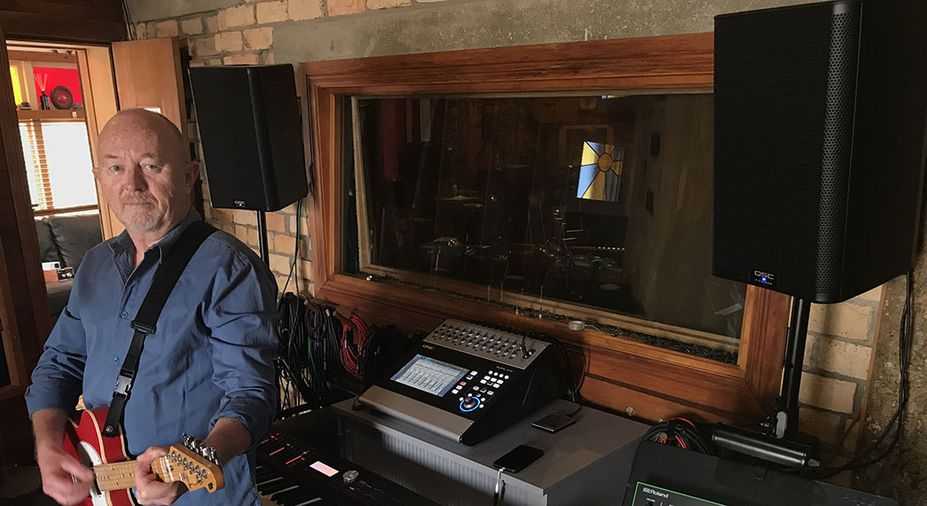
Confined due to the current global pandemic crisis, many of you are now rehearsing, composing and recording music in your home studio. This article aims to give you practical advice and tips on the most crucial aspects of your home studio setup in order to create an ideal production environment.
Before starting, some of you are most certainly proud owners of QSC K.2 Series™ active loudspeakers that you have used for live performances, gigs, event productions or parties. Have you ever noticed that in the eleven Presets featured in K.2 Series, one of them is called ‘Studio Monitor’? Our loudspeaker engineering team developed this preset having your Home Studio in mind! This ‘Studio Monitor’ Preset features an extremely flat frequency response – a key specification for a quality studio monitor – and a very tight low-end. With this preset, the aim is to give you a reference loudspeaker that will reveal the truth about the audio you are monitoring, without adding or removing anything form the content you are producing.
Now, let’s look at your room and its setup and follow few simple steps to optimize your production environment. Always remember that what we hear is the combination of our listening ability, the actual loudspeaker’s performance and the room acoustic.
Identifying Your Listening Area
1. Whenever possible orientate your setup (front-to-back) along the largest room dimension.
2. Next, find the left-right symmetry axis of your room and make sure the listening position is located along that axis.
3. Divide your room from front to back into three equally sized areas – front, center and rear – and place your home studio gear in the ‘front’ area. Then, try to place the listening position right at the beginning of the ‘center’ area, avoiding to be sitting right along the dotted line marking the third of the length of your room.
4. Resonances between your room’s hard surfaces are called standing waves or room modes. These resonances always exhibit sound pressure maxima at the surface. So, always try to place the listening position at least 1 meter (3.3 feet) away from any walls to avoid such pressure-maxima areas.
Placing Your Loudspeakers
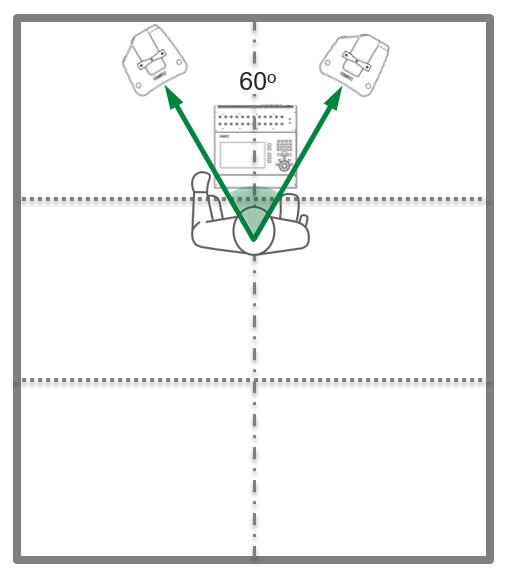
1. To achieve an accurate stereo reproduction, the angle between the left and right loudspeakers should be 60° degrees and both loudspeakers should be aiming towards the listening position.
2. The recommendation for the height placement of a studio loudspeaker is ear level, usually between 1.2 to 1.4 metres (4 to 4.6 feet) from the floor. Placing the loudspeaker higher with a slight tilt can minimise floor reflections. This can easily be done with QSC K.2 Series as all three loudspeakers feature dual pole cup mounts providing standard and 7.5 degrees down-tilt. Additionally, always make sure that, the maximum tilt angle is equal or less than 15 degrees to avoid increasingly strong reflections from surfaces nearby the loudspeakers.
Avoiding Detrimental Reflections
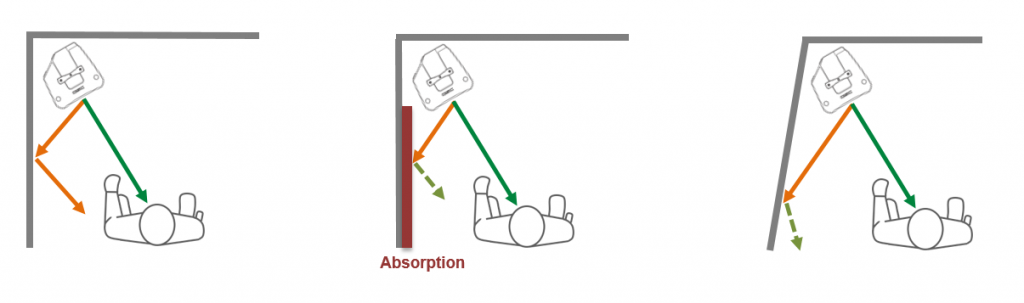
Hard, solid walls, ceiling and floor reflect sound and as a rule, the sound level at the listener increases when the reflected sound is in phase with the direct sound. Reversely, the sound level will decrease when the reflected sound is out of phase with the direct sound.
1. If your home studio room surfaces have not been designed to diffract, or absorb incident sound energy, most of the reflected sound energy will leave reflective walls with an angle identical to the incident once. Consequently, it is best to avoid placing loudspeakers close to nearby sidewalls and the ceiling to minimize any strong reflections that could travel towards the listening position.
2. When room dimensions agree with the sound wavelength, sound energy accumulates to form resonances. These resonances form standing waves in the room, with sound pressure maxima (high sound intensity) and minima (low sound intensity) in certain specific locations in the room depending on the resonance’s frequency. Hence, the location of the loudspeaker in the room will affect how much the room mode resonances collect energy and how audible they become. If you face such challenge, moving slightly the loudspeakers may help to reduce the impact of these problematic room mode resonances.
3. The listening position may also be unfavorably situated relative to room mode resonances. For example, if the listening position is located in a sound pressure minima (low sound intensity point), as you listen to audio in that location specific frequencies will appear to be missing and your mix may lack punch and dynamic. Moving the listening position forward or backward can help solving this problem.
Remember that the most accurate stereo imaging can only be obtained when the reflections are similar on both sides of the room. This can simply be achieved by maintaining the same distance to the nearest sidewalls, by placing the left and right loudspeakers at the same height and symmetrically within your room.
Bass Boost and Radiation Space
Let’s recall here some fundamentals in the physics of sound. First, sound propagates differently depending on frequencies. As shown below it spans from omnidirectional radiation at low frequencies to highly directive high frequency propagation.
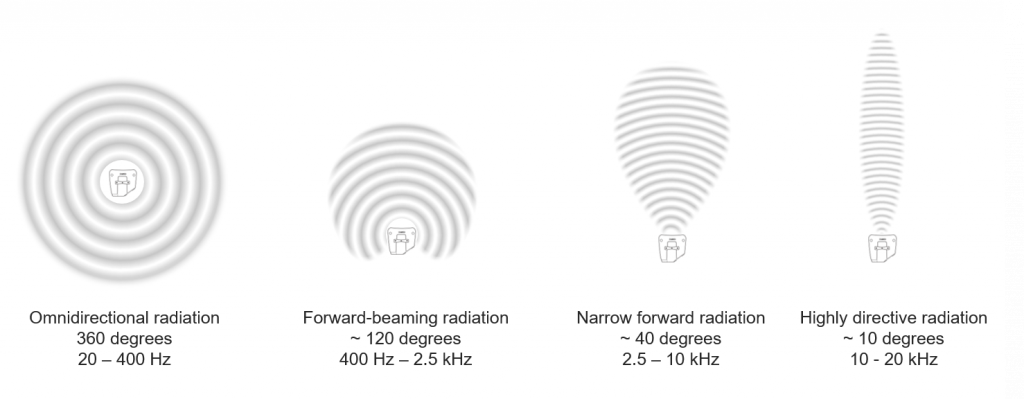
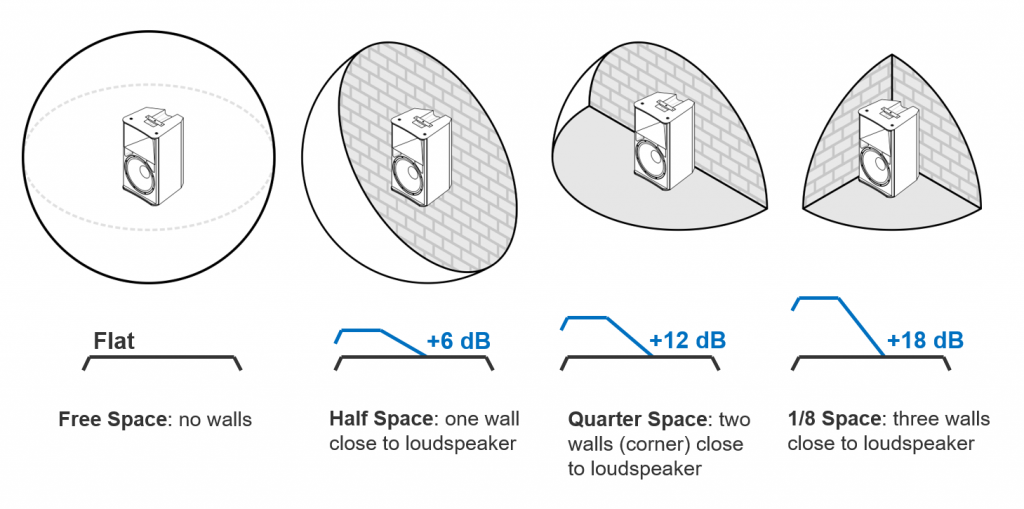
The second term to explain here is the so-called ‘radiation space’ which simply defines the volume into which a loudspeaker is radiating sound. We have to observe that, at low frequency (below 200 Hz), the sound level increases when hard walls limit the radiation space. Every halving of the radiation space by a wall close to the loudspeaker doubles the sound pressure level.
A loudspeaker with a typically flat low frequency response below 200 Hz in free space (ex. your K.2 with ‘Studio Monitor’ Preset selected) produces up to 6 dB higher sound level when placed against a solid wall. In a corner (two walls), this gain can be up to 12 dB!
So, what should you do about this? Well, make sure that if your home studio loudspeaker is either against a wall or close to a corner, you reduce the bass level output, below 200 Hz or so, from a few decibels until the bass reproduction becomes clear, tight and punchy again. Excessive low frequency levels will tend to reinforce certain bass notes, create some resonances and a muddy audio mix with undefined dynamics. To reduce the low frequency response of your home studio loudspeaker, either use the loudspeaker’s on-board EQ – as featured in QSC K.2 Series – or setup a shelving-filter below 200 Hz in your mixer – something very easily done in any QSC TouchMix digital mixers.
Back Wall Cancellation and Loudspeaker Placement
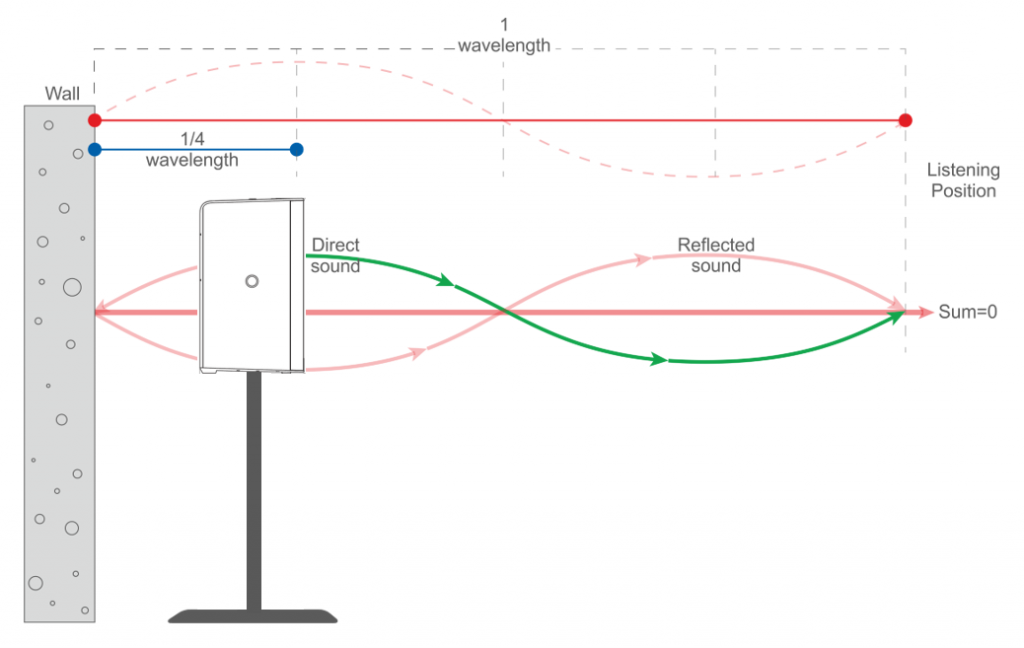
Let’s look at another phenomena that occurs below 200 Hz. When there is some distance between a loudspeaker and the wall behind it, at the frequency where this distance is equal to one quarter of the sound wavelength emitted, the wall reflection is out of phase with the loudspeaker forward radiation. Hence, the sound reflected by the wall at this specific frequency will cancel the loudspeaker’s forward radiation of the same frequency. At this specific frequency, sound level will be significantly reduced. This is called ‘comb filtering cancellation’ and, unfortunately, equalization of the loudspeaker’s output does not help, as the same level change applies also to the reflected sound off the wall behind it.
Now, what can you do about this in your room? To avoid this strong cancellation try to first push the loudspeakers’ back as close as possible to the wall. This will ensure that the low frequency output is not compromised. However, make sure you recall what was explained in the previous chapter about bass boost when a loudspeaker is placed close to a wall. Adequate adjustment of its low frequency response is necessary.
Alternatively, you could place your loudspeakers slightly away from the wall behind it, but always make sure that the distance from the loudspeakers’ front to the wall behind it is equal or less than 0.6 meters (2 feet). This way, the low frequency reproduction will remain unaltered. Moving the loudspeakers further away from the wall may appear appealing if you have a larger room, but acoustically you will find it is a compromise, as the back wall cancellation effect described above will start to be very effective!
Conclusion
If it is highly practical and comfortable to rehearse, compose or record music in your home studio, it is also essential to remember that the acoustic environment of your home studio has a major influence on the overall sound quality of your productions. Walls, ceiling, and floor as well as large objects like mixing consoles, tables, equipment racks and furniture cause reflections that should be minimized as much as possible. Loudspeakers’ placement in a small room is not always easy but there are few simple advices once can easily follow to make the best out of your QSC loudspeakers.
Last, but not least, remember that today most quality loudspeakers – including QSC models – are capable to play audio at significantly high levels. In a home studio, the listening distance is rather short, so one good measure to apply is to get a sound level meter, find some calibration tone (broadband white or pink noise) and set your loudspeakers so that the typical listening level at the listening position is 85 dB. All the best in re-organizing your home studio room and in correctly setting up your QSC loudspeakers!
Christophe Anet
Derniers articles parChristophe Anet (voir tous)
- History, Development and Applications of Column Loudspeakers - May 30, 2025
- Why is Dynamic Range so important? - May 30, 2023
- Differences between Flown and Floor-Mounted Subwoofer Deployments - May 2, 2023
This is great and timely information for me as I am doing just that, setting up a home studio scenario with my QSC K.2 system, Ks112 sub, and Touchmix 16.