Subwoofers are great solutions to extend the low frequency performance of your PA system, and there are three aspects to consider carefully when setting up a subwoofer. In the following order.
Subwoofer Placement
If subwoofers are used in many portable and installed PA applications to enhance the overall listening and performance experience, their placement in a room, on stage or below it is, in fact, critical. Understanding how to easily calculate the distances from a hard, solid back wall to where subwoofers can be safely placed in order to provide great bass reproduction is important. These points have been discussed in a separate blog called ‘How to correctly place a subwoofer in a room’.
All the recommendations you will find in this other article are valid, no matter if you use a single subwoofer, or multiple units. Placing the subwoofer(s) in the best possible location will make a difference on the global bass reproduction in the room. You might need to negotiate a little, move the PA system a few times, but in the end, it will serve the performance and provide a greater impact to the audience.
Crossover and Phase
The second aspect is to first make sure the crossover setting between the subwoofer and the main loudspeaker(s) is correctly adjusted. This topic was discussed in the blog called, ‘KS Series crossover settings do and dont’. The basic principle to remember is that both the low-pass filter (limiting the upper subwoofer bandwidth) and the high-pass filter (limiting the low-end of the loudspeaker(s) bandwidth) should have a matching frequency. Additionally, the lower this frequency is, the better for the subwoofer audio reproduction quality, as it is important to make sure we cannot localize the subwoofer. If the subwoofer reproduces too much upper-bass information, then our ear/brain will start to localize the sound source, which is not desired, as it can compromise the overall stereo imaging created by the main loudspeakers. KS Series subwoofers provide 80 Hz and 100 Hz crossover frequencies.
With crossover comes also the question of the phase relationship between the main loudspeaker(s) and the subwoofer. The blog on ‘How to setup delayed loudspeakers’ covers this topic, which is entirely applicable to this current discussion. Remember that, 1 ms of delay corresponds to 35 cm/13.5 inch. So, each time the distance between the loudspeakers and subwoofer’s front baffle is equal to, or a multiple of, 35 cm/13.5 in, you will need to add one, or more, milliseconds of delay to achieve correct phase alignment across your PA system.
PA System Connections
Comes the third aspect: setting the level of the subwoofer compared to the main loudspeakers. Before we can discuss how to get it right, we must differentiate between two different types of PA system connections.
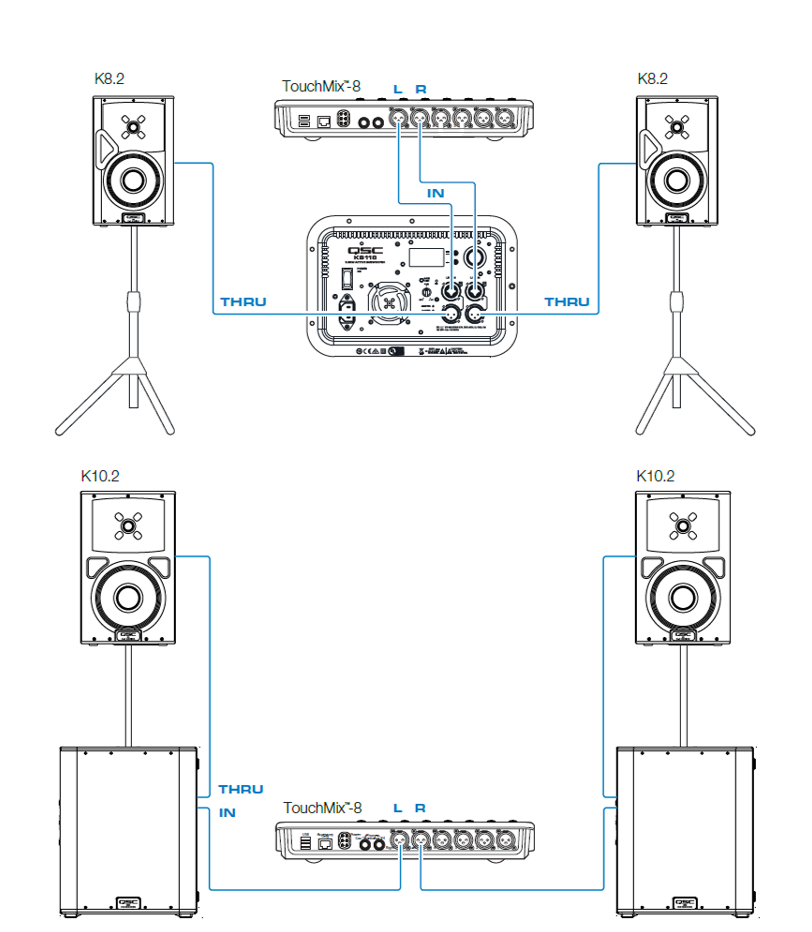
The first method is to connect, for example, a KS Series active subwoofer together with a pair of K.2 Series active loudspeakers utilizing the subwoofer’s onboard crossover. The stereo signal is sent to the subwoofer first, and the thru outputs on the subwoofer send the stereo signal to the respective left and right loudspeaker. Of course, the low-pass crossover frequency (say 80 Hz) set on the subwoofer has to match the high-pass set on each loudspeaker. Using this connection method, and as the gain on KS Series subwoofers is unity, the signal entering and leaving the subwoofer has the exact same level. Therefore, the level of the complete PA system can be easily controlled at the mixer (or any other audio device sending the audio signals) with a perfectly matched level setting between subwoofer and loudspeakers.
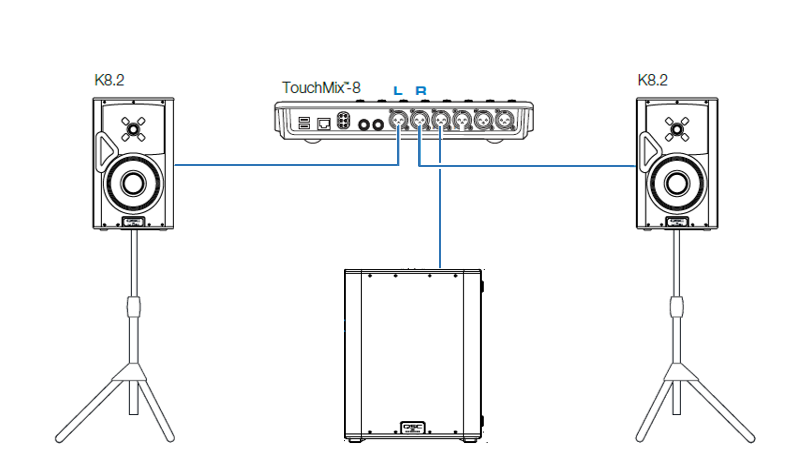
The second method is to send separate signals to both main loudspeakers and to the subwoofer. As an example, this can be done using a mixer master left/right outputs that are sending audio to the main left/right loudspeakers, and an Aux output that will send the same left/right signals to the subwoofer, as a single, summed-mono signal. If the crossover frequencies (subwoofer low-pass/loudspeakers high-pass) still have to be correctly set, the controls of the loudspeakers and subwoofer levels are now totally independent.
Level Setting
Sound level meters come in various forms, either as an app on a smartphone, or as a dedicated hardware equipment. In all cases, select a sound level meter that can be set to C-weighting and Slow scale. Frequency weightings used in sound level meters are related to the response of the human ear and this specific C-weighting is essentially linear between 31.5 Hz and 8 kHz, with very soft roll-off below and above these frequencies.
In order to compare the levels (in dB) between the loudspeakers and the subwoofer, we need two different test signals that are, each, able to deliver the same amount of energy over the same audio bandwidth (musical octaves) to both the loudspeakers and the subwoofer. Sending broadband signals would not work as the bandwidth reproduced by a subwoofer is significantly smaller than the one reproduced by a loudspeaker and therefore, by definition, the sound pressure levels measured cannot be compared. This is why we need two types of filtered noise; one test signal with a spectrum between 500 Hz and 1333 Hz (mp3/flac) and another between 30 Hz and 80 Hz (mp3/flac). Both test signals have a bandwidth spreading over 1.415 octave and are available for download at the end of this article.
Measurement Procedure
- Make sure you select a crossover frequency (low-pass and high pass) centered at 80 Hz.
- Play Noise 1 through both main loudspeakers at the same time, without the subwoofer. This is a stereo noise signal with no correlation between the left and right channels, so the two signals will mix acoustically without phase cancellations and large level variations.
- While reading the SPL level on your sound level meter at a given distance from the main loudspeakers (reference position), adjust the source volume to a desired calibration level (say 75 dB). The actual level you chose is not critical.
- Record the position of the faders/knobs that produces this 75 dB SPL output for the loudspeakers on the audio source equipment.
- Next, play Noise 2 through the subwoofer by itself (no main loudspeakers) and set the volume to the same calibration level (75 dB) using the SPL meter at the reference position defined earlier.
- Record again the position of the faders/knobs that defines 75 dB SPL for the subwoofer on the audio source equipment.
Your PA system is now level-calibrated and properly balanced. Having recorded these output levels in the source equipment, you can now chose to increase the subwoofer level, for example, keeping at all times a calibrated-system reference point.
Additionally, if you use a PA system with one loudspeaker combined with one subwoofer for the left channel, and the same setup for the right channel, apply the same measurement procedure described above in feeding only the left loudspeaker with Noise 1, instead of both left and right boxes.
Similarly, if your setup has two loudspeakers and one subwoofer per channel, make sure you feed Noise 1 to both loudspeakers on the same channel. This will ensure that no matter how many loudspeakers you have per side, the PA system will be as balanced as possible.
Conclusion
While adding a subwoofer to your PA system provides additional LF extension, setting it up may become a difficult task, unless you follow a simple procedure. First, select the best possible location for the subwoofer in the room, then, adjust crossover and phase, and last – but not least – set the subwoofer level correctly, in case you feed it separately from the main loudspeakers. Our hearing abilities are limited at low frequencies, and therefore it is highly important to follow the above documented steps to make the most of your subwoofer in all applications and venues. Happy bass listening!
References
Noise 1 (for main loudspeakers)
Pink Noise, Stereo, Uncorrelated, 500 Hz – 1333 Hz (1.415 octave), 2 min, -20.0 dBFS RMS, -6.8 dBFS peak.
500 Hz to 1333 Hz.mp3
500 Hz to 1333 Hz.flac
Noise 2 (for subwoofer)
Pink Noise, Stereo, Uncorrelated, 30 Hz – 80 Hz (1.415 octave), 2 min, -20.0 dBFS RMS, -8.0 dBFS peak.
30 Hz to 80 Hz.mp3
30 Hz to 80 Hz.flac
Christophe Anet
Latest posts by Christophe Anet (see all)
- History, Development and Applications of Column Loudspeakers - May 30, 2025
- Why is Dynamic Range so important? - May 30, 2023
- Differences between Flown and Floor-Mounted Subwoofer Deployments - May 2, 2023
Great article, very informative and educational. Thanks much. I learned a lot.