When mixing live audio, one of the biggest mistakes a sound operator can make is aimlessly applying EQ without intentionality due to of lack of understanding. In this article, I hope to equip you with knowledge and understanding about frequencies so that you know exactly what it is that you are manipulating as you sculpt a musical, well defined, clear and present live mix.
In Part 1 of this subject we discussed how your EQ tools function. I would encourage you to read Part 1 before diving in to this one.
What Is Frequency?
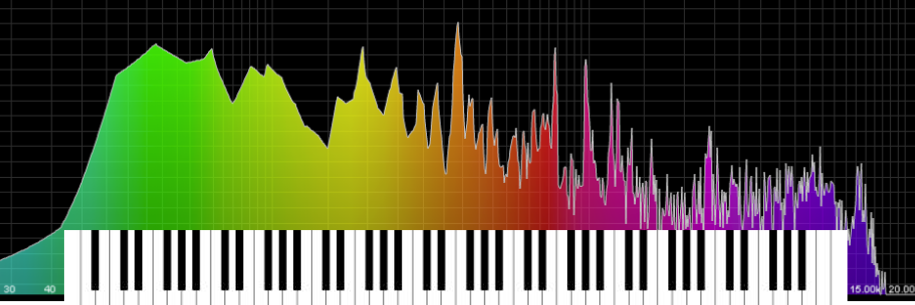
Frequency, in its most pragmatic definition, is the exact number of times, or cycles, the waves of a particular sound move through the air per second. Hertz, named after German physicist Heinrich R. Hertz, is the unit of measurement used to identify frequency. One complete cycle that travels in one second is 1 Hertz (Hz).
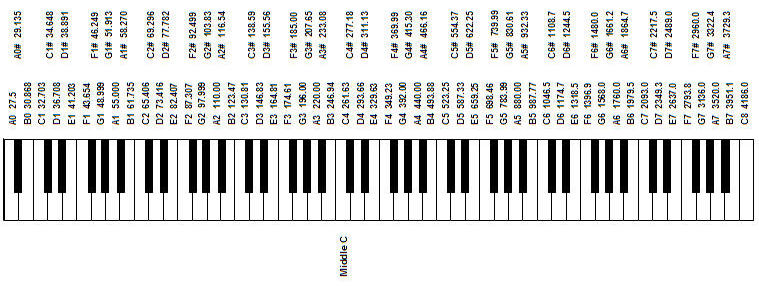
A low E string on a guitar vibrates at 82.41 Hz. When plucked, its sound waves complete 82.41 cycles in one second. Middle C on a piano resonates at 261.63 Hz. The full range of standard 88 key piano from its lowest note (A0) all the way to its highest (C8); 27.50 Hz – 4186.01 Hz. All sounds have a frequency number identifying the exact number of cycles per second.
Musicians refer to the notes they play as “pitch” or “pitches”. They use letter names such as, C, Eb, G#, F, Db, and so forth. On the EQ tools used by studio and live sound engineers, these same pitches or notes are referred to in terms of frequency numbers or Hz. So, simply put, frequencies and notes are the exact same thing.
Learning What Frequencies Sound Like
Knowing what these frequencies sound like as it relates to mixing music is highly beneficial in order to create a clear and distinct mix.
A trained musician has already been working with frequencies when they play their instrument(s) and/or sing. Generally, these people need only to memorize the frequency numbers associated with the musical notes they already know.
For the untrained ear there are some great online resources as well as apps for your smart device to help a person develop auditory recall of frequencies. Here are some of my favorites.
https://theproaudiofiles.com/quiztones/
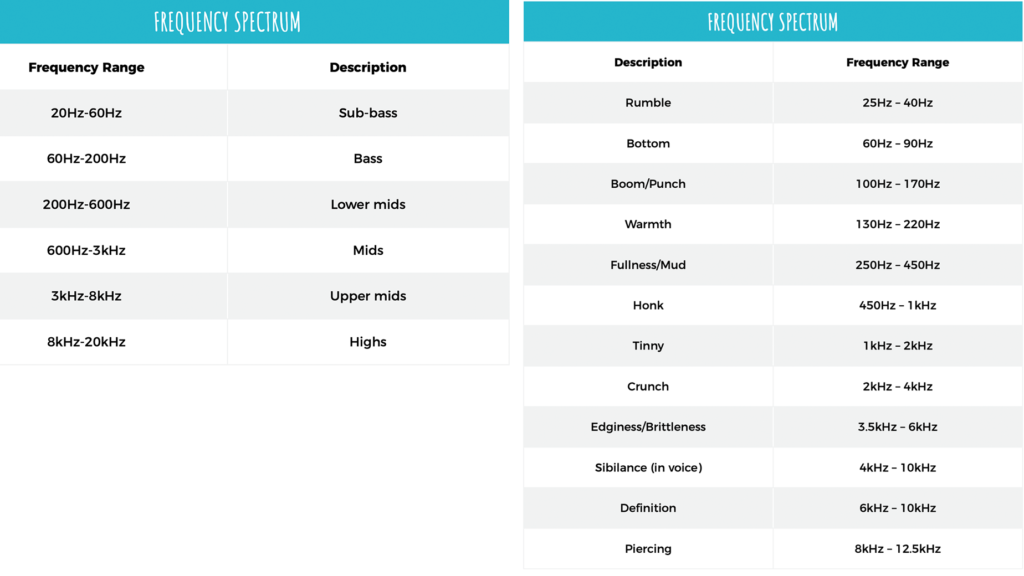
When it comes to sculpting the tone of an instrument, it’s helpful to recognize what frequency range to boost or cut in order to achieve your desired effect. The following chart describes what various frequency ranges sound like. However, reading this chart won’t teach a person auditory recall. Actually working with frequencies and listening to what they sound like when they are boosted or cut will properly train the human ear what to listen for.
Here’s an exercise that you can do. Play your favorite music and then using either a parametric or a graphic EQ, practice boosting and cutting these frequency ranges to learn how it affects the sound.
Know Your Instruments
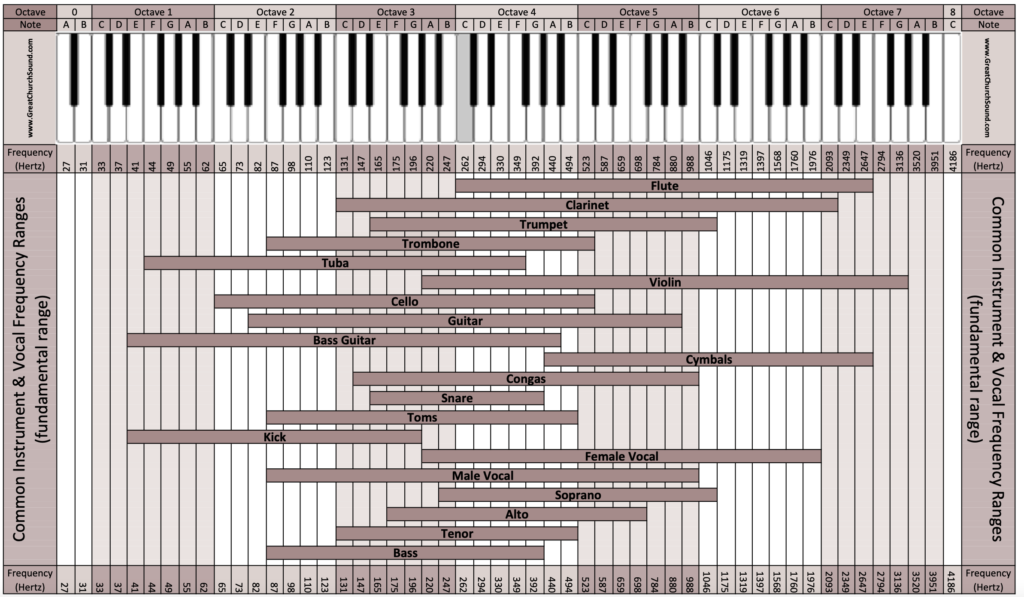
Every instrument has a fundamental frequency range, meaning the notes that an instrument can produce. The first step to knowing how to apply EQ, is understanding where all your instruments fit on the frequency spectrum. This chart displays the fundamental frequency ranges of several common instruments. If you’re unfamiliar with the frequency ranges of instruments you work with regularly, keep this chart close by so you can quickly reference it. For those instruments not listed here, use your good friend, Google, to find out.
Great Sound Starts with a Great Signal Source
Let’s have a quick discussion about “signal-to-noise ratio”. The signal is the source that you want to amplify in a specific channel; for example a vocal or an instrument like acoustic piano, guitar, etc. Noise is any other audio content that you don’t intend to amplify; for example loud guitar amps or drums bleeding into vocal microphones or piano mics. We want a strong signal and as little noise as possible in our microphones. The louder the signal and the quieter the noise, the better signal-to-noise ratio. An excellent signal to noise ratio is the first step in creating a clear and defined sounding mix.
Microphones should be placed close to their sound source to minimize unwanted noise. Learn more about microphones here.
Amplifiers and other signal sources on stage should be producing the full range of frequencies appropriate for that instrument. Musicians on stage will often times EQ their own amps and electronics in hopes of achieving a certain tone but end up diminishing frequencies that are needed in order to sound clear in the mix. For example, an electric guitar player who will roll-off too many of the high frequencies on the guitar amp. It’s not possible to EQ frequencies at the mixing console that aren’t being produced by the source on stage.
It’s important to set a healthy input gain at the mixing console. Depending on the manufacturer, this could be referred to as trim, head amp or pre amp. The input gain is the first component of the signal chain once the signal enters the mixing console. All other processing in your mixing console, including EQ, is affected by the input gain setting. Learn more about setting input gain here.
Diving Deep into the Process
Now that you have a grasp on what frequencies are (notes), what are the fundamental frequency range of instruments (notes that each instrument is capable of producing), as well as how to establish good signal to noise ratio, I will walk you through a step by step EQing process. When I am working with a live band, my aim is to create a clear and present mix, and EQ is one great tool to achieve that. Stay tuned for part 3 of “How to Create a Clear and Present Mix Using Your EQ Tools.”
Golden Preciado
Derniers articles parGolden Preciado (voir tous)
- The Sound Behind the Scenes: The Psychology Behind Navigating Personalities - April 8, 2025
- Making the Transition from Floor Wedges to In-Ear Monitors - October 22, 2024
- Lavalier (Lapel) vs Headset Microphones - August 5, 2024