
Subwoofer failures have several causes. Repeated failures indicate that there is something wrong with the application or the installation. Simply replacing woofers will not fix the underlying problem. Well-designed, high quality subwoofers should not fail. Check the following things to find the real issue.
1. The room is too big. Another way of saying this is you’re not using enough subs for the room size. No matter how much power you put into the subwoofer, you may not be able to move enough air to get the low frequency response you want if you aren’t using enough subwoofers to begin with. In fact, you will only end up with reason #2. Trying to cut corners on subwoofer quantity can be expensive later on. A dual 18” sub isn’t much more expensive than a single 18” sub, but it has 6 dB more output capability. An amp in stereo mode powering two subs will play louder than the same amp bridged into a single sub.
2. Overpowering. Overpowering causes over-excursion (the voice coil travels too far out of the gap) and premature damage to the subwoofer. A very rough guideline is to use an amp that can provide about twice the power handling capacity of the subwoofer. However, there are many exceptions to this guideline, so please check with us for specific recommendations for your application. For typical applications, a DCA 3422 can be used in stereo mode to power each pair of dual 18” subwoofers. Bridging a pair of channels from a DCA 1824 or DCA 1222 works well for a single subwoofer system.
3. Improper placement of the subwoofers. A great way to avoid overpowering or using too few subs is to take advantage of free acoustic power (see “Free Loading”). Multiple subwoofers should always be grouped together and placed slightly off-center at the bottom of the screen for maximum efficiency and smoothest coverage. Spreading the subwoofers into two stacks will cause wide variations in level as you move across the room. If you set the level in a location where there is a dip in coverage, and increase amp gain, you may be making the system far too loud at other locations in the room. Ideally, the subs should be flush mounted in a full baffle wall, but if no baffle wall is used, place the subs directly against the back wall behind the screen. A gap between the speaker cabinet and the rear wall can cause a large dip in frequency response due to cancellation by the sound reflected from the wall.
4. Using a B6 boost filter when it’s not needed. A B6 filter adds a 6 dB electrical low frequency boost to the loudspeaker enclosure at the port tuning frequency. The B6 filter in the QSC SF-3, DCM, DPM, or DCP should only be used if needed to flatten the RTA response of the sub. Switch it off if the sub response is fairly flat from 30 Hz to 100 Hz. When using a parametric EQ to flatten the sub response, cutting peaks is better than trying to boost dips.
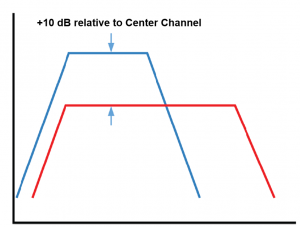
5. Setting sub levels incorrectly. Once you have the correct frequency response for the subwoofer, then you can set the levels. A simple SPL meter cannot be used to set subwoofer levels. The narrow frequency response range of subwoofers causes the meter to read much lower than the actual subwoofer level. The level must be set by an RTA using the “plus 10 dB of in-band gain” method. The subwoofer is set 10 dB higher than the center channel. Of course, the center channel must be properly calibrated before this step is taken. In all cases, a high pass filter for the sub is required, usually at about 22 to 25 Hz. The SF-3, DCP, DCM and DCP processors provide this feature even when the B6 boost is not being used. Non-QSC processors may not provide this feature, which may allow excessively low frequency signals to reach the subwoofer amp, causing over-excursion and damage to the woofers. In ported enclosures, frequencies below the box tuning frequency dramatically increase cone travel and the likelihood of damage with little increase in output.
 6. Your single microphone RTA measurement is giving you bad information. Subwoofer response can vary dramatically in level throughout the room due to room modes caused by the long wavelength of subwoofer frequencies. A single microphone may have been placed in a zone where there is a dip in the response. Trying to “EQ-up” the low frequencies can result in excessive levels in other parts of the room. It’s much better to use a multiple microphone technique and equipment such as the AcoustX D2. If you do, make sure all mics are spread out and working correctly. Look at each mic individually and see if the response is significantly different from the other three; if there is a large difference, move mics as needed to get the most even response. If you don’t have access to a 4-mic RTA, try moving the mic to several locations, and make sure you are not in a zone with an unusually lower level than the rest of the room.
7. RTA’s and mics are not correctly calibrated. If your gear is not properly calibrated, the levels can be dramatically inconsistent. We often find 3 to 6 dB errors on previously installed systems in the field when we assess rooms with our calibrated D2 RTA with four mic multiplexing. Single mics and RTA software for laptops will not give properly calibrated results unless you use a real measurement microphone and a calibration instrument, and check the levels often.
8. Improper wiring. If you’re using more than one subwoofer and they are wired out of polarity, they will cancel each other out and result in very high drive levels when trying to reach the desired SPL. This can happen in a number of ways. The input to the amps could be wired incorrectly. QSC DataPort connections prevent this problem, but if you are wiring to the standard amp inputs, it is best to wire only Channel 1 and use the parallel input switches to send the signal to channel 2. If the amp is driving a pair of subs (one sub per channel), the bridging switch must be turned off. Putting an amp in bridge mode sends an out of polarity signal to Channel 2. The output wiring can also be a problem. Check to see that the “+” amp outputs are connected to the “+” subwoofer inputs.
9. Unmatched amplifier gain. All subwoofer amp channels must be set to the exact same level to prevent one subwoofer from working much harder than the others. With DataPort inputs, this is simple; amp gains are turned all the way up. You can try all the way up when using other amp inputs, but sometimes you need to back them down equally to have a proper gain structure and lowest noise floor. Don’t mix DataPort and other amp connections in the same system. DataPort input gain and XLR input gain are not the same on DCA amps.
Subwoofer drivers do not repeatedly fail in a properly designed system. Don’t cut corners on the number of subs and try to make up for it with more power. It may cost a little more, but one service call will more than offset any perceived savings of an inadequate system. Even the best gear can fail if it is not correctly installed and calibrated. A thorough check of wiring and calibration should be a mandatory part of diagnosing any subwoofer failure. Don’t just bolt another driver in the box.
A powerful and impressive subwoofer system is a great way to differentiate the cinema experience from streaming content on a PC or tablet. Don’t cut corners, and you will have happy customers for many years.
Barry Ferrell
Neueste Artikel von Barry Ferrell (alle ansehen)
- Cinema and Pro Audio: A Comparison of Loudspeakers - July 6, 2021
- DPM=Three in One - June 16, 2021
- All Subwoofers Are Not Created Equal - May 6, 2021